- 公開日:
Google Chat Botとは?作成方法とおすすめの使い方
有料アカウント(Google Workspace アカウント)向けのGoogle Chatで使えるbot機能ですが、まだ使ったことがない方も多いのではないでしょうか?
Google Chat botには100以上の種類があり、botを使用することでタスク管理を行ったり、さまざまな業務効率化が可能になります。
ここではGoogle Chat botについて詳しく説明するとともに、おすすめの使い方と作成方法をご紹介します。
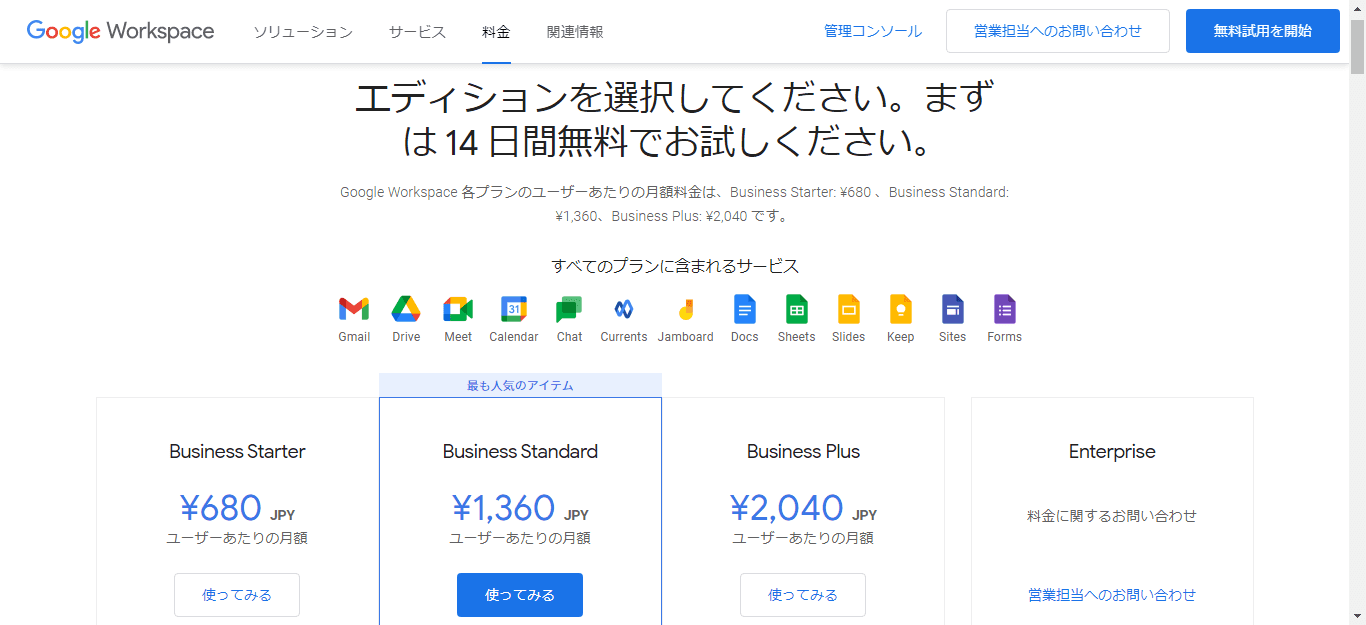
Google Chat botを使うためにはGoogle Workspaceのユーザーになる必要があります。
Google Workspace アカウント(有料)は14日間無料で試用できますので、botを体験してみませんか?
Google Chat Bot(ハングアウト チャット bot)とは?
「bot(ボット)」とは、「ロボット(ROBOT)」が語源の言葉です。一定のタスクや処理を自動化するプログラムやアプリケーションのことを表します。
よって、「Google Chat bot」とは「Google Chatのbot」ということになります。
botはロボットのユーザーで、botとのメッセージを通じてGoogle Chatから情報の検索や会議のスケジュールの設定などのサービスにアクセスできます。
botには、Googleが作成して管理しているbotとサードパーティソフトウェアのベンダーが作成して管理しているbotがあります。
英語で書かれているbotがほとんどですが、おすすめのbotの使い方を次項でご紹介しますのでご参照ください。
おすすめの使い方
Google Chatに追加できるbotの中からおすすめのbotの使い方をご紹介します。
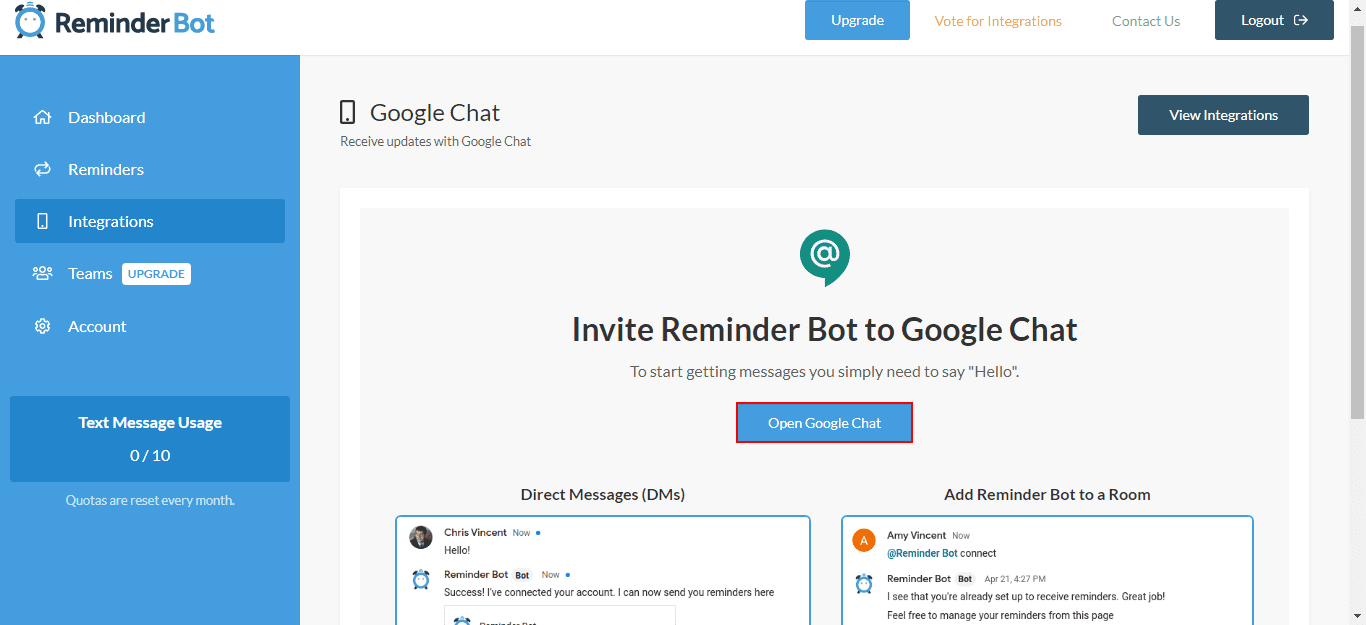
リマインドBot
リマインドbotとは、忘れてはいけないやるべきタスクをリマインドしてくれるbotです。つまり「To Do リストbot」になります。
ここでは、「Reminder Bot」の基本的な使い方をご紹介します。
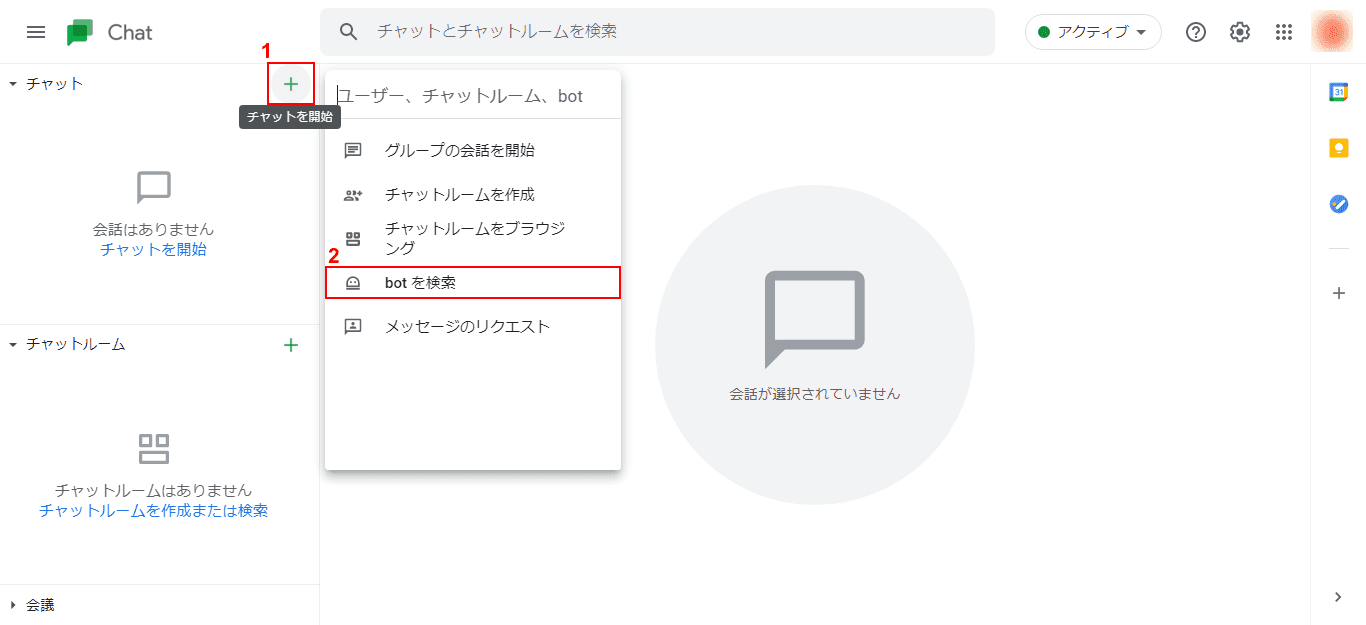
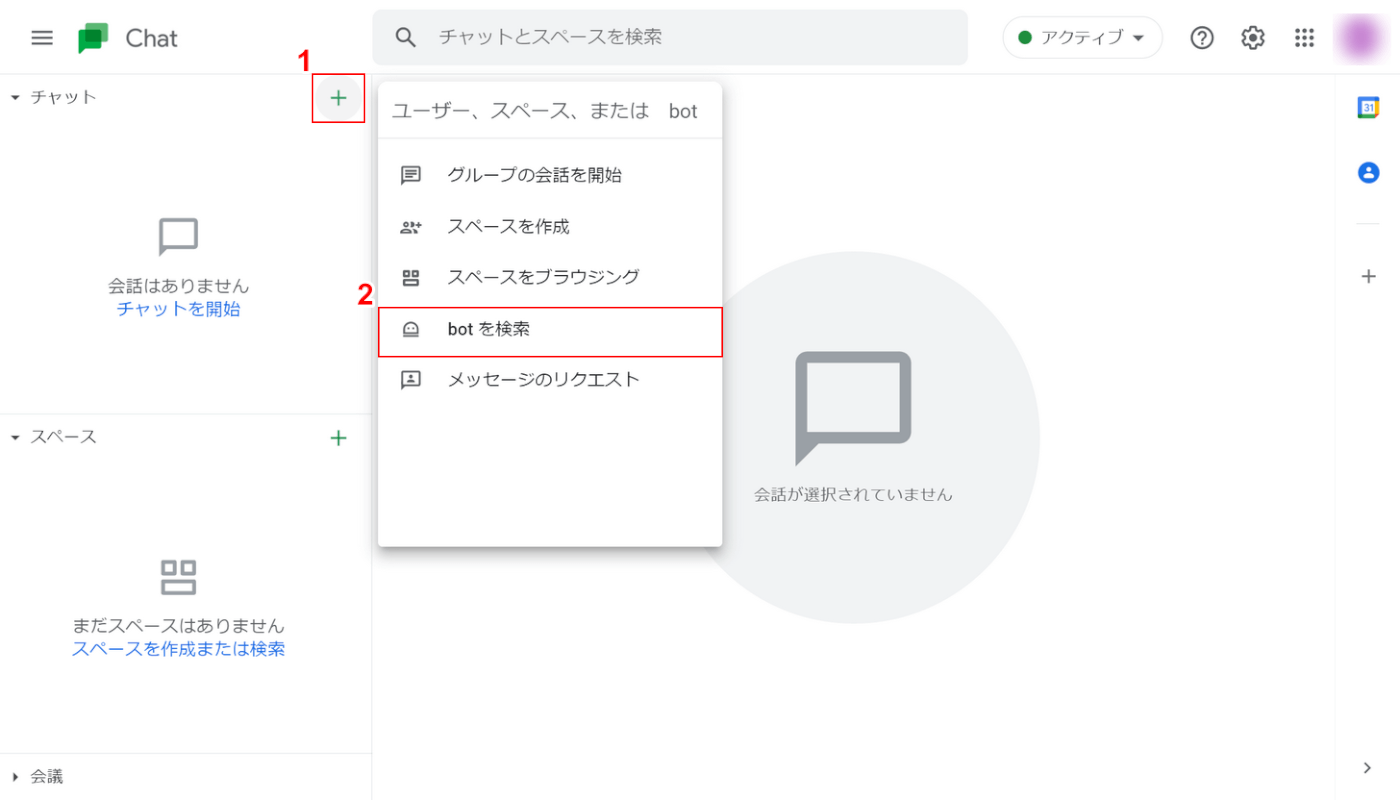
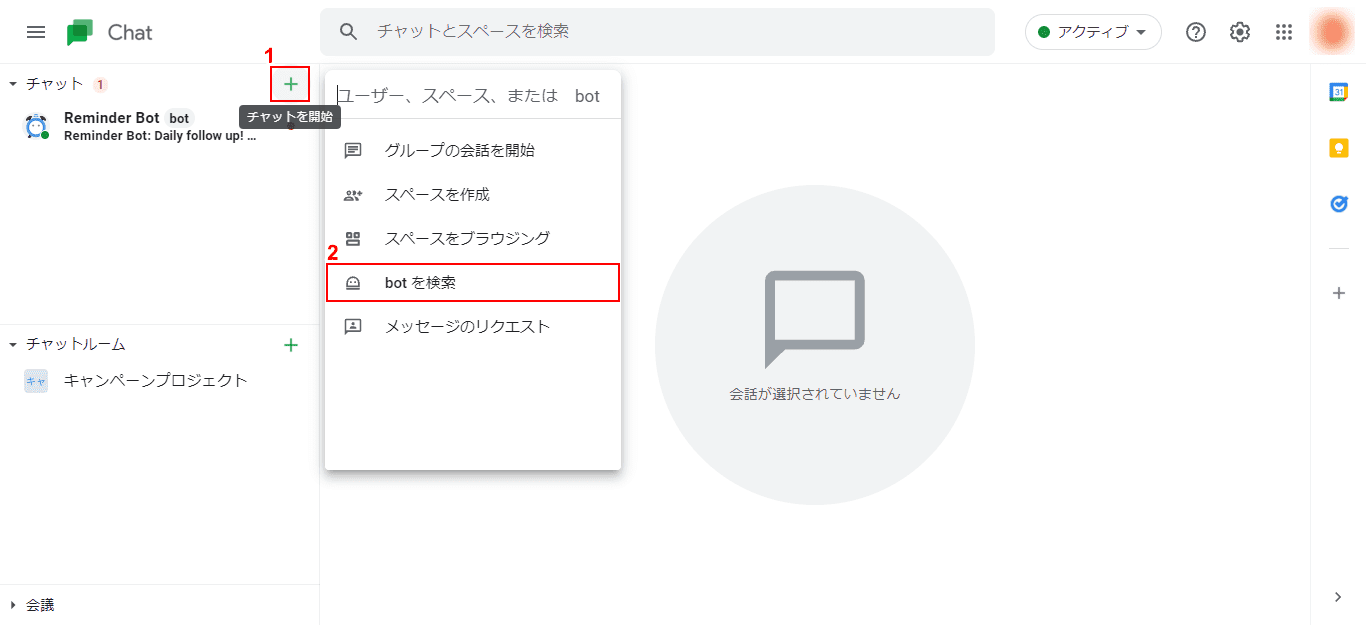
有料アカウントにログインした状態でGoogle Chatにアクセスし、①「+(チャットを開始)」アイコンをクリックし、②「botを検索」を選択します。
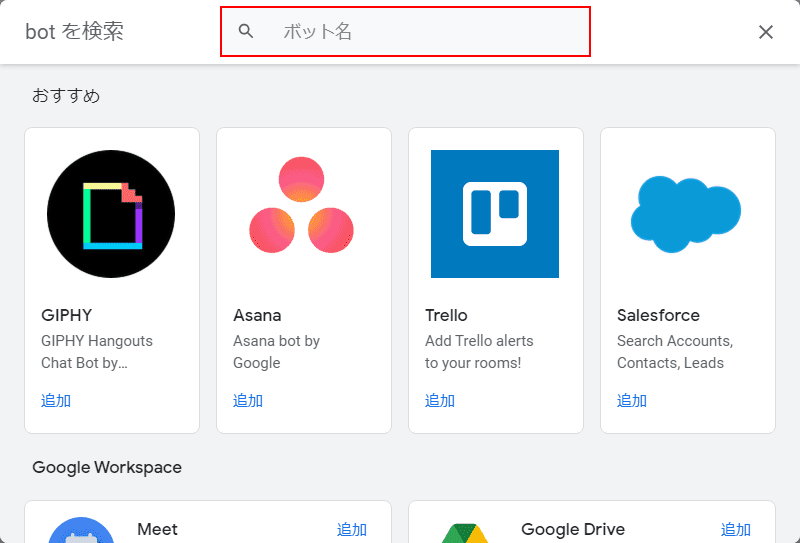
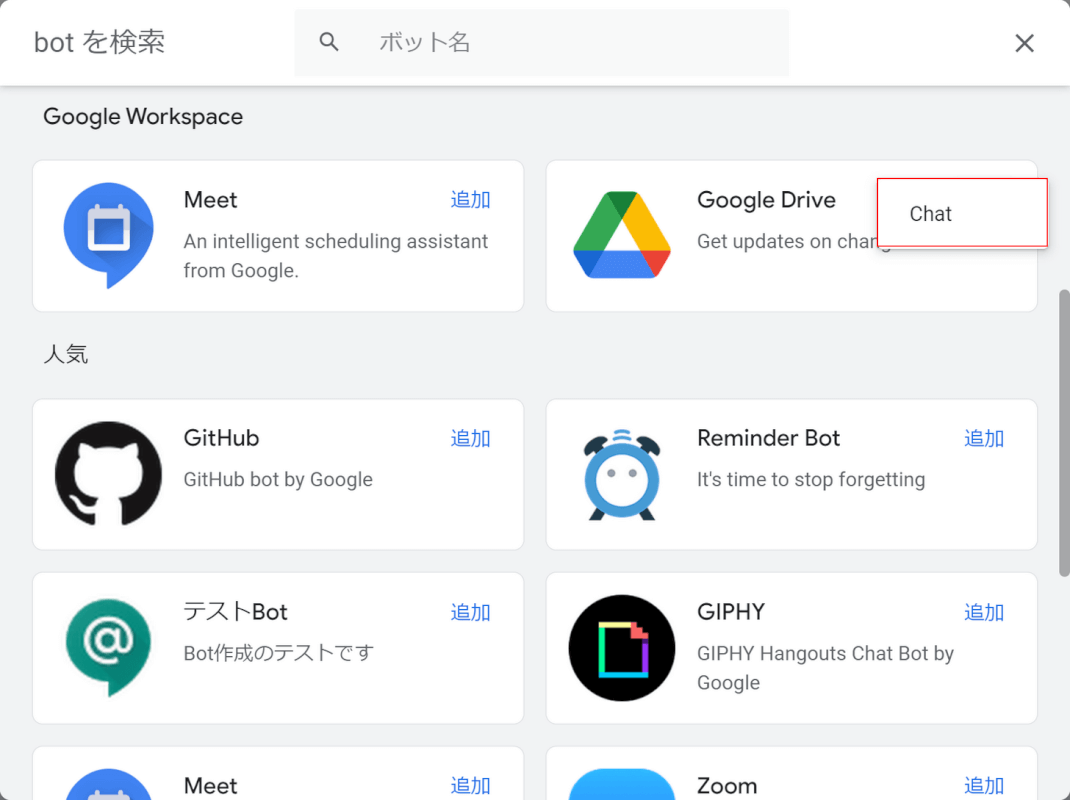
「bot を検索」ダイアログボックスが表示されますので、検索ボックスへ「Reminder Bot」と入力します。
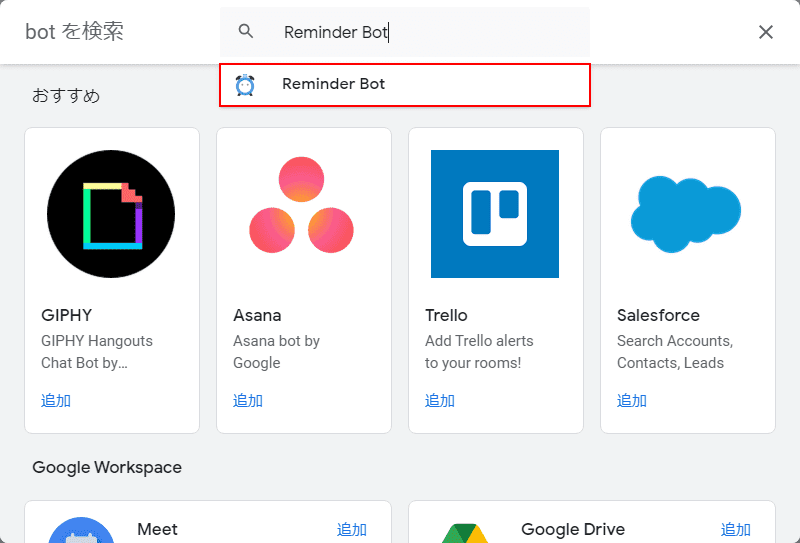
検索結果が表示されますので、「Reminder Bot」を選択します。

「Reminder Bot」の詳細情報が表示されますので、botと1対1でチャットする場合は「Chat」ボタンを、チャットルームに追加する場合は「チャットルームに追加」ボタンを選択します。
例として「Chat」ボタンを選択します。
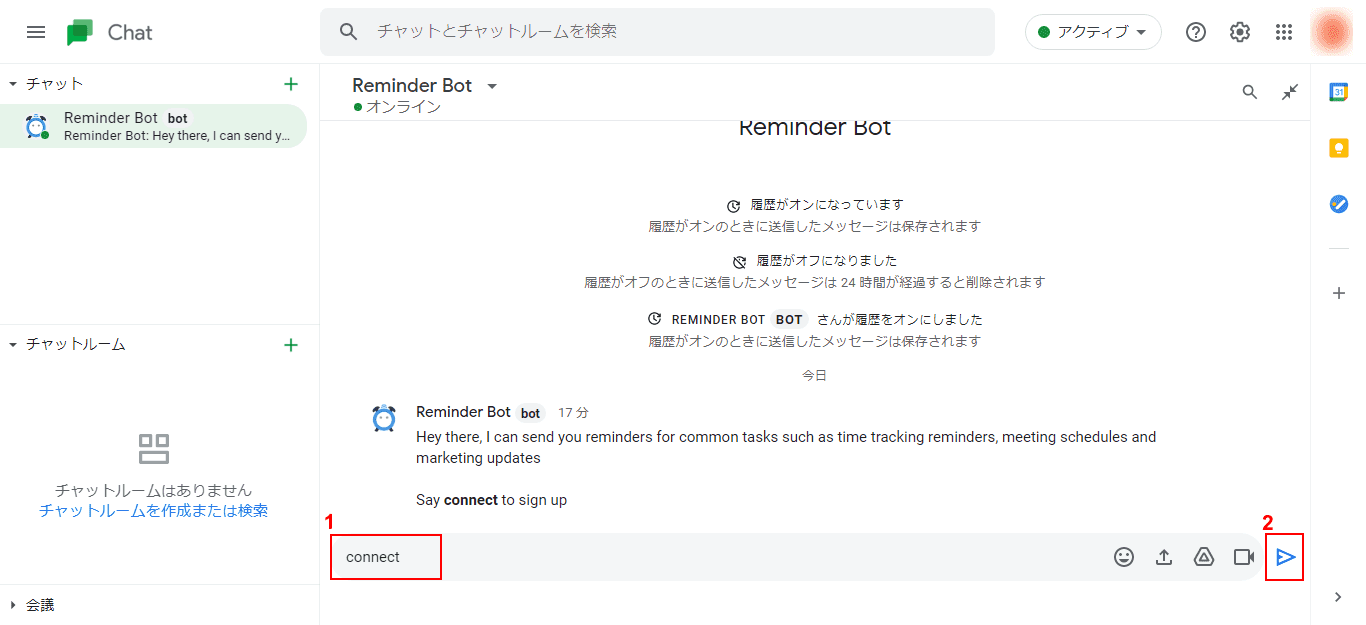
「Reminder Bot」とのチャットが始まります。すべて英語なので、Google 翻訳を使って和訳してもよいでしょう。
「Say connect to sign up(サインアップするために接続すると言って)」と記載されていますので、①「connect」と入力し、②「送信」アイコンをクリックします。
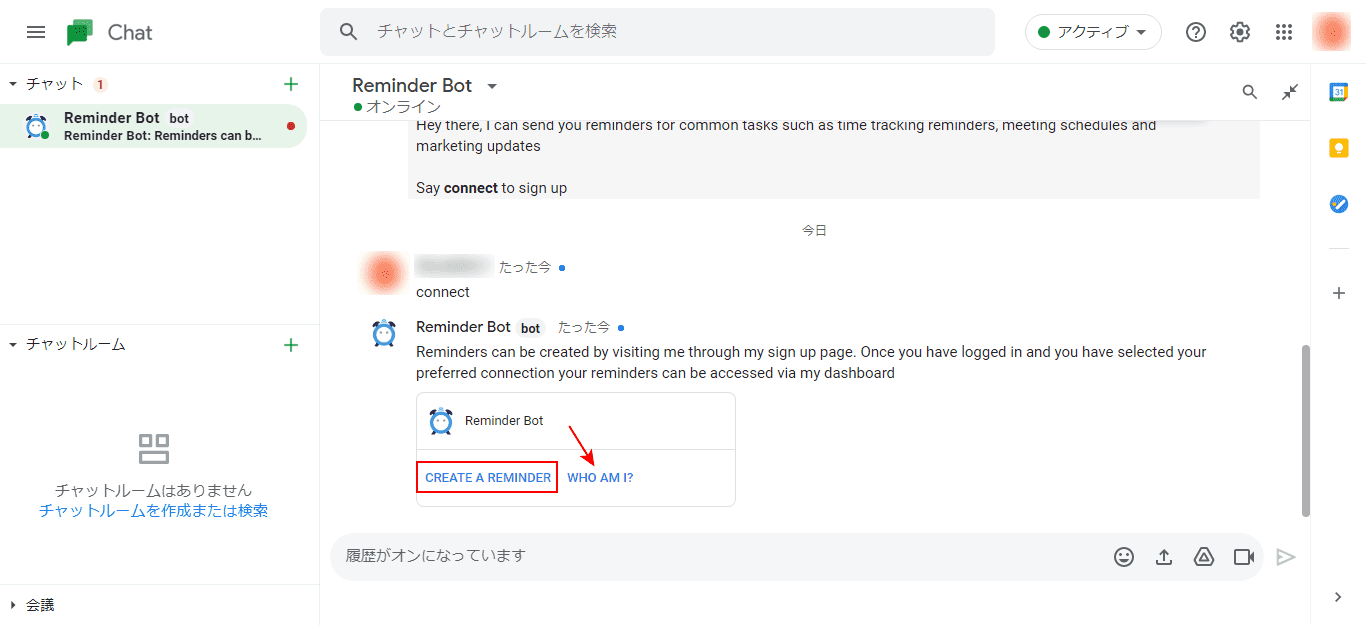
「Reminder Bot」からの返信が表示されますので、「CREATE A REMINDER」をクリックします。
「WHO AM I?」をクリックすると、「Reminder Bot」に関する詳細情報(英語)を確認することができます。
無料で利用できるのは「1リマインダー」までとなっています。
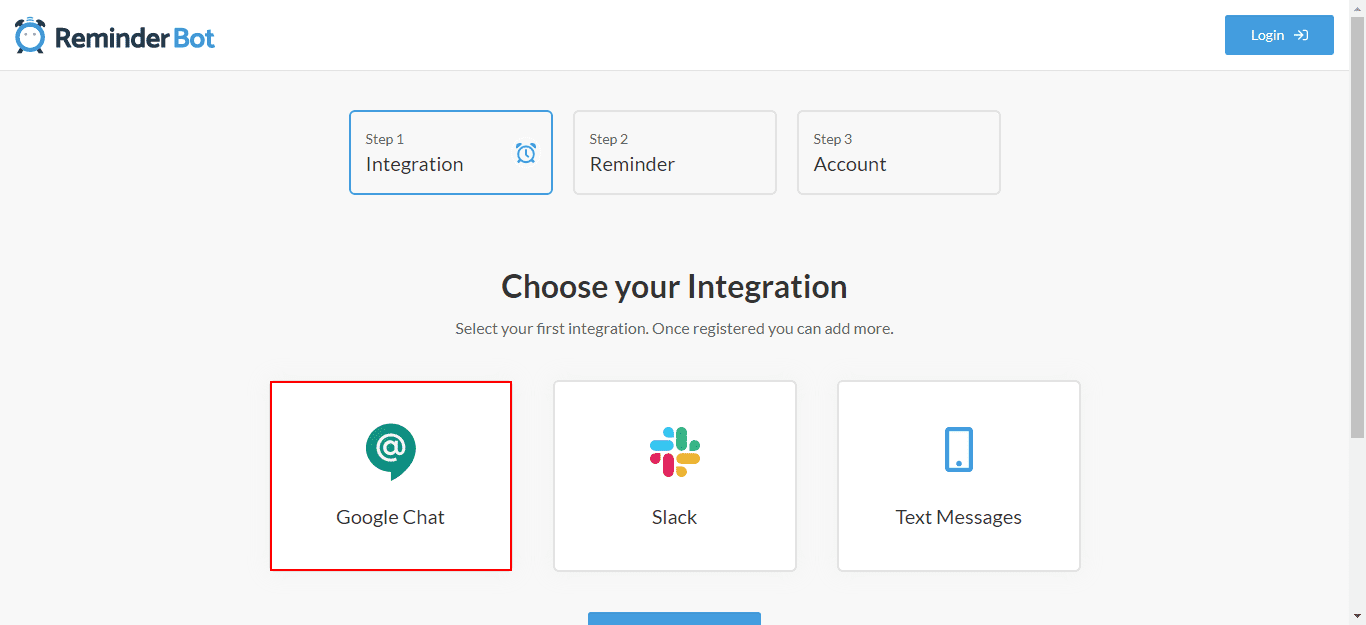
統合するものを選択するページが表示されますので、「Google Chat」を選択します。
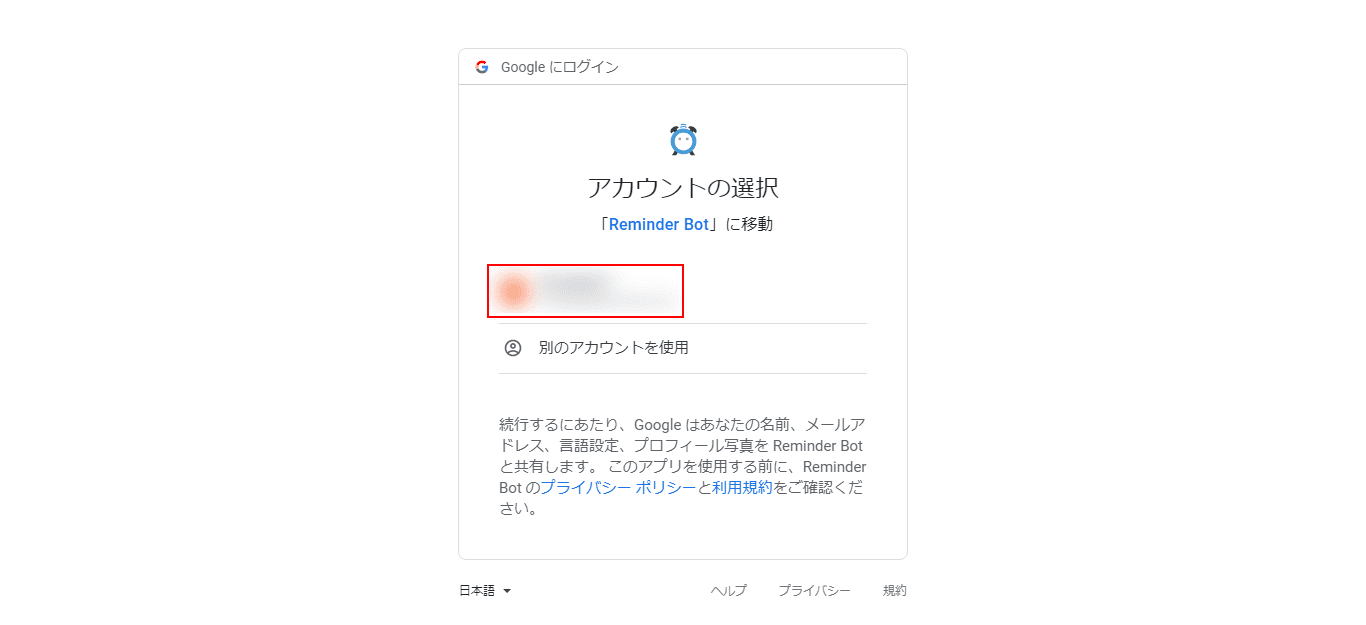
「アカウントの選択」ダイアログボックスが表示されますので、利用するアカウントを選択します。
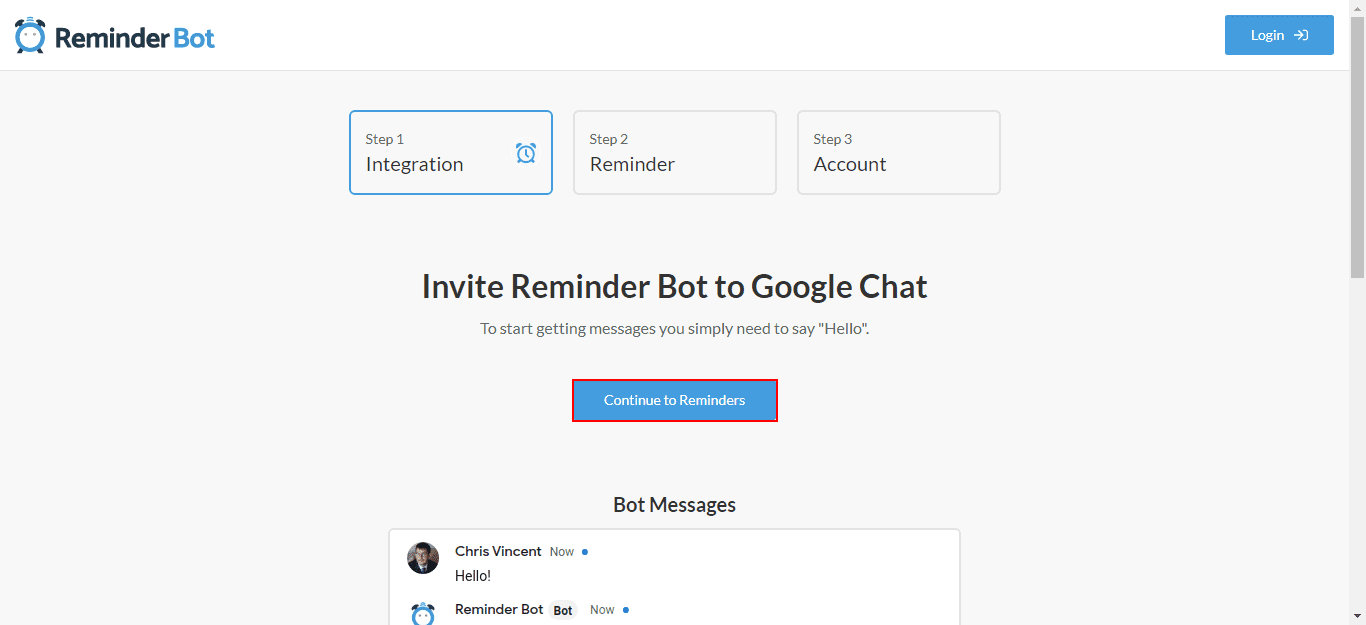
Google Chatに「Reminder Bot」を招待しますので、「Continue to Reminders」ボタンをクリックします。
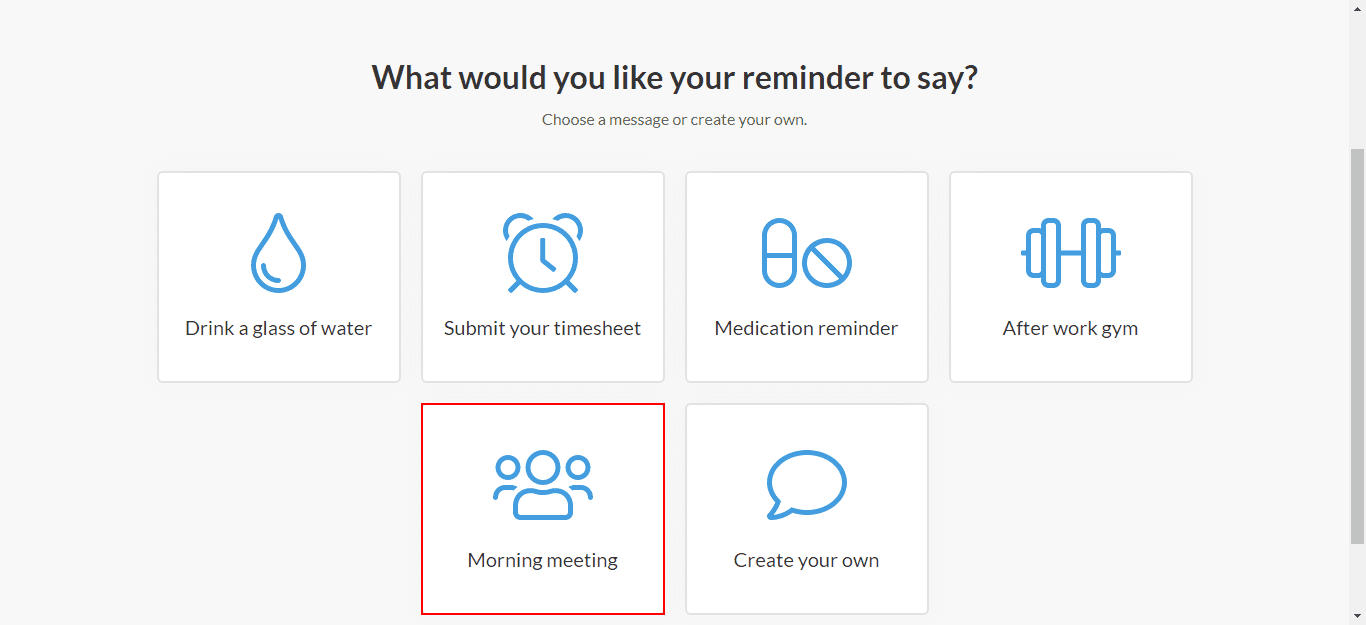
リマインダーに何を言いたいかを選択します。
「Drink a glass of water(コップ一杯の水を飲む)」などのメッセージまたは「Create your own(自分で作る)」を選択します。
例として「Morning meeting(朝の打ち合わせ)」を選択します。
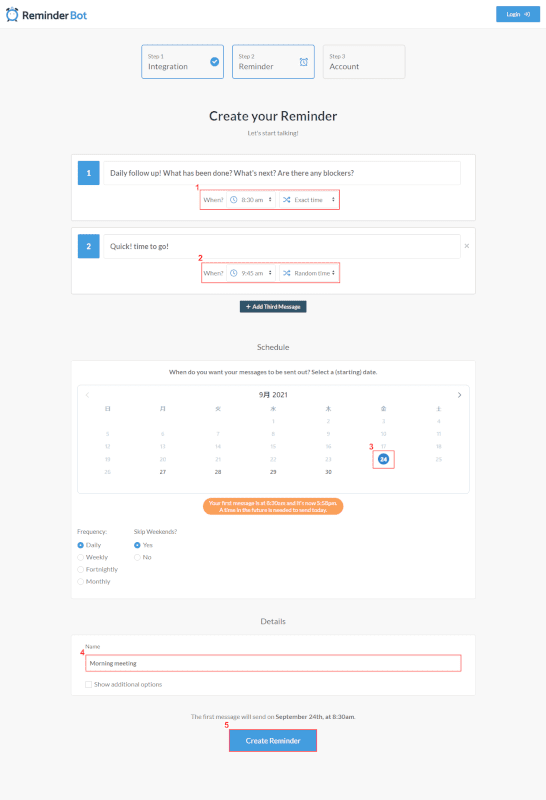
リマインダー作成画面が表示されますので、①フォローアップの時間、②行く時間、③スケジュール、④詳細を設定し、⑤「Create Reminder」ボタンをクリックします。
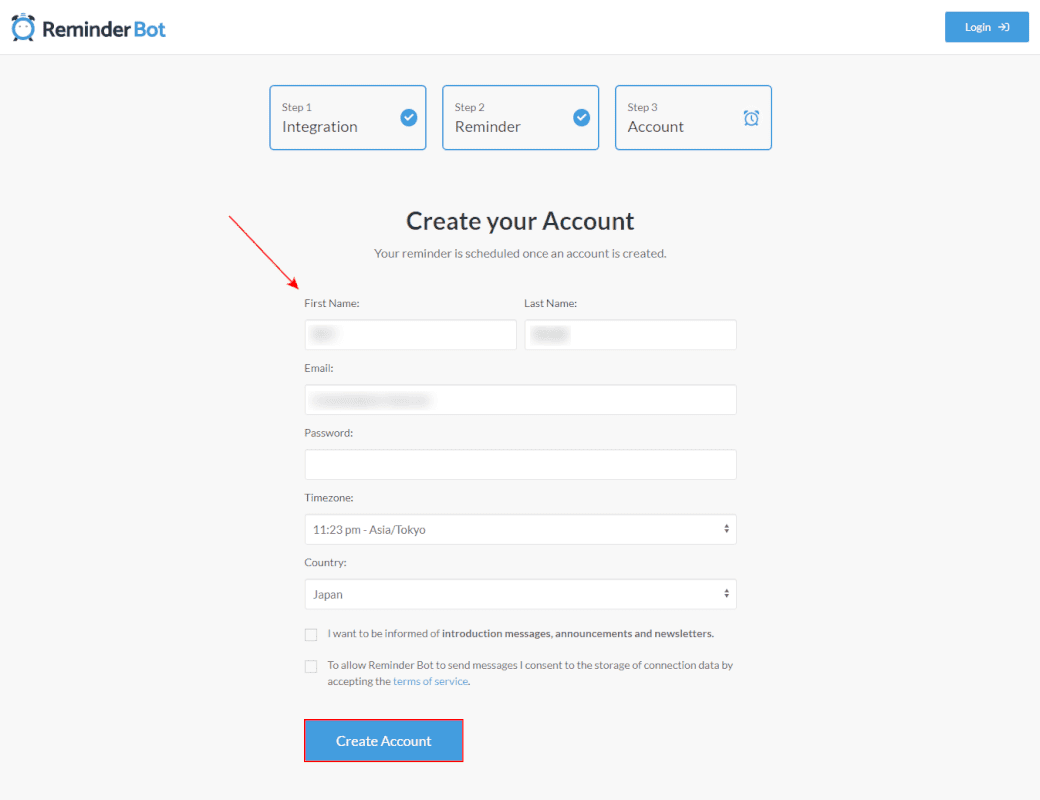
アカウント作成画面が表示されますので、氏名やパスワードなどすべて入力し、「Create Account」ボタンをクリックします。
「Reminder Bot」のトップページが表示されます。
「Open Google Chat」ボタンをクリックすると、Google Chatが開きます。
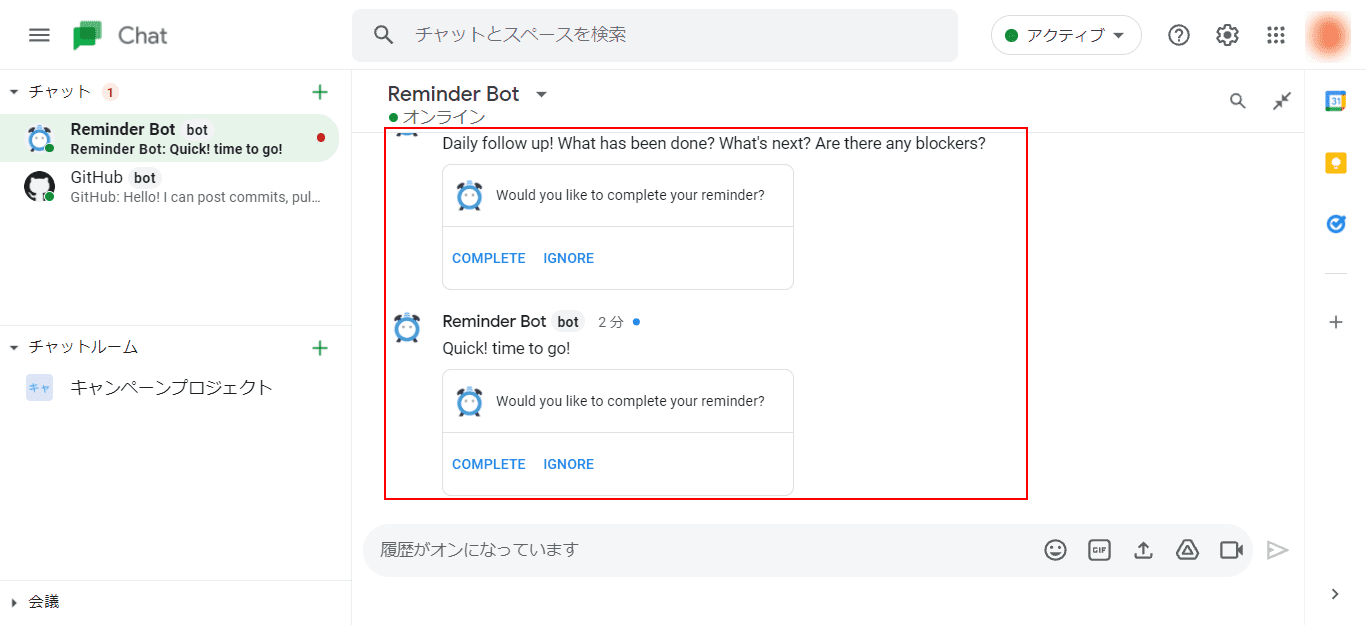
時間になると、Remainder Botから上記のように通知されます。
Google Drive(スプレッドシートなど)と連携
Google Driveの通知をGoogle Chatで受け取れるBotを追加します。スプレッドシートが共有されたときにGoogle Chatに通知が届くようになります。
有料アカウントにログインした状態でGoogle Chatにアクセスし、①「+(チャットを開始)」アイコンをクリックし、②「botを検索」を選択します。

「botを検索」ダイアログボックスが表示されます。Google Driveの「追加」をクリックします。
「Chat」をクリックします。
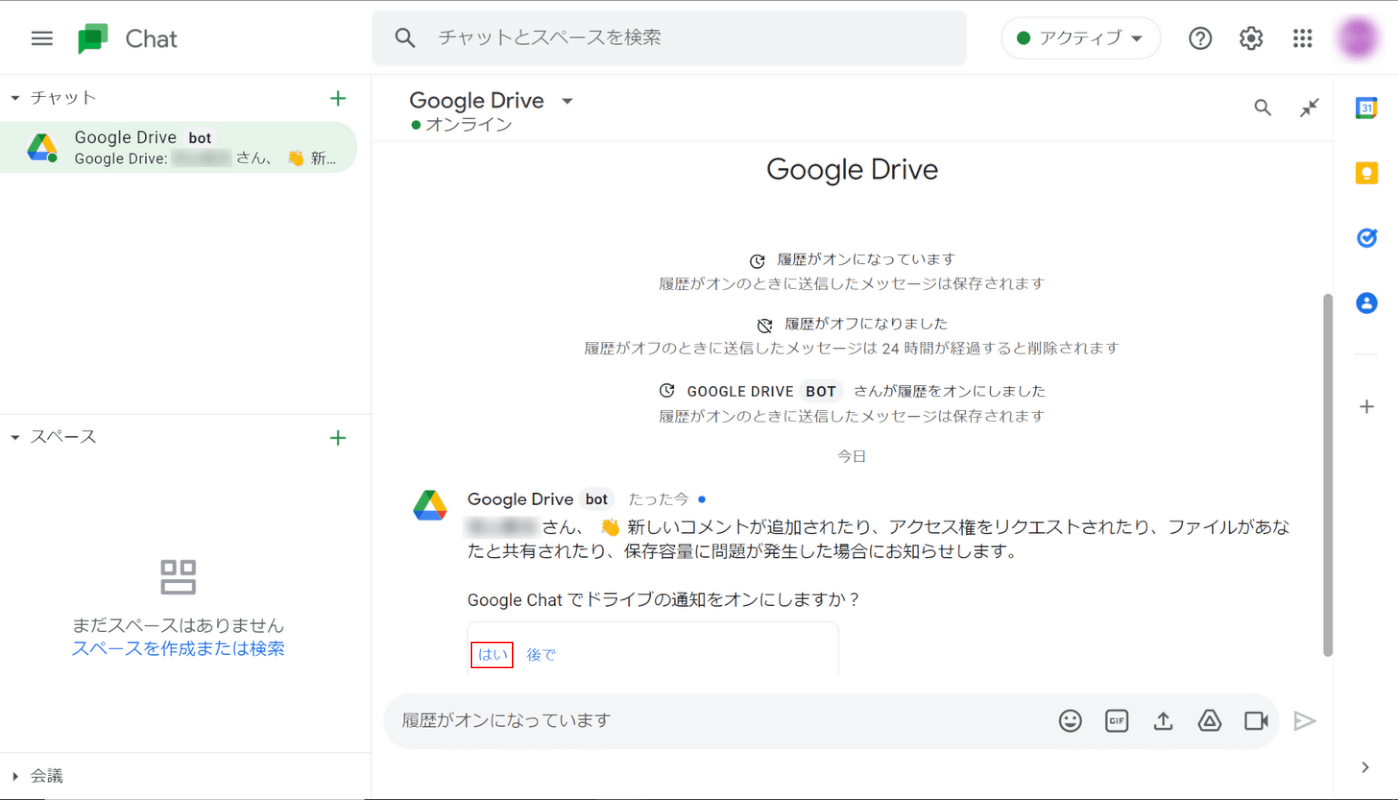
チャットにGoogle DriveのBotが追加されました。Google Chatでドライブの通知をオンにしますか?と聞かれるので「はい」をクリックします。
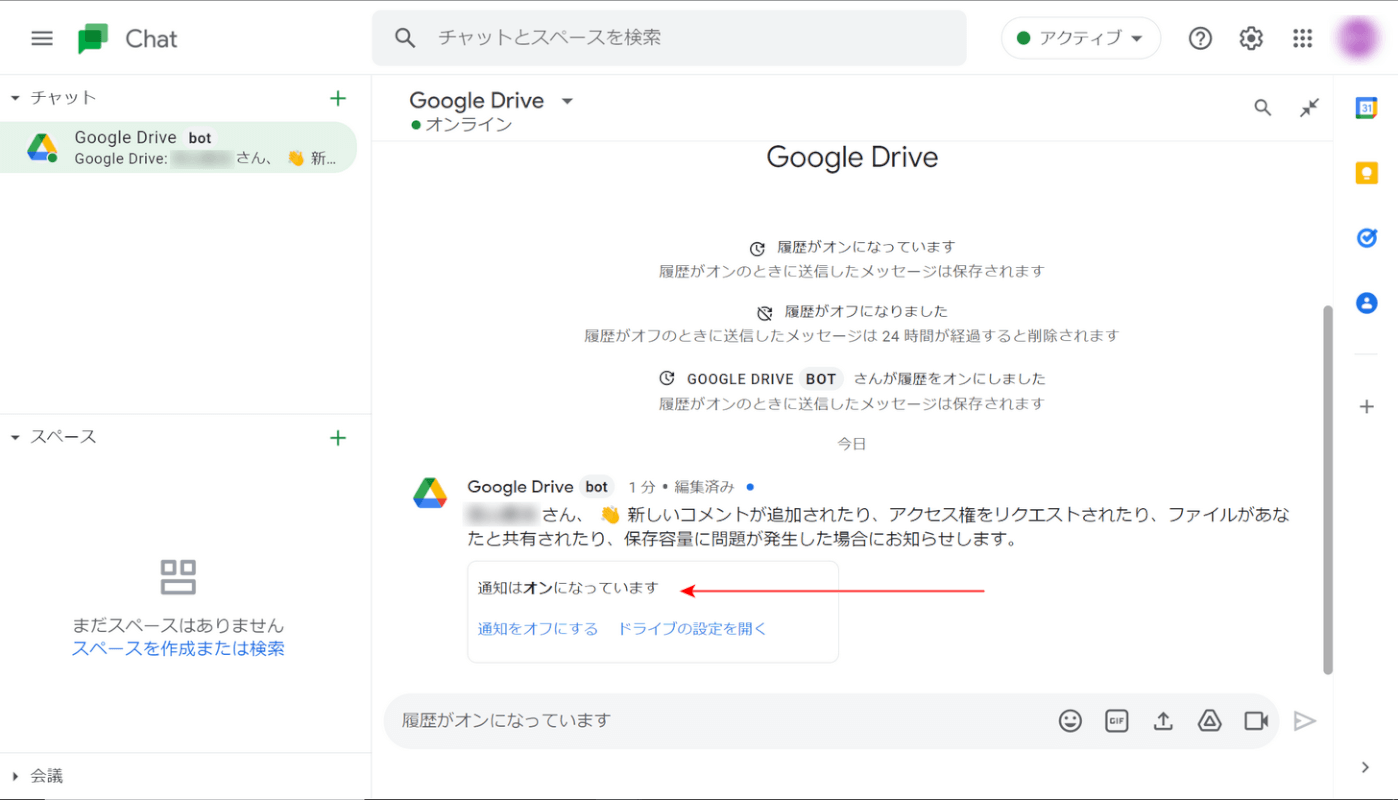
「通知はオンになっています」と表示されます。
通知をオンにすると、Google ドライブで新しいコメントが追加されたり、アクセス権をリクエストされたり、ファイルが共有されたり、保存容量に問題が発生した場合に通知されます。
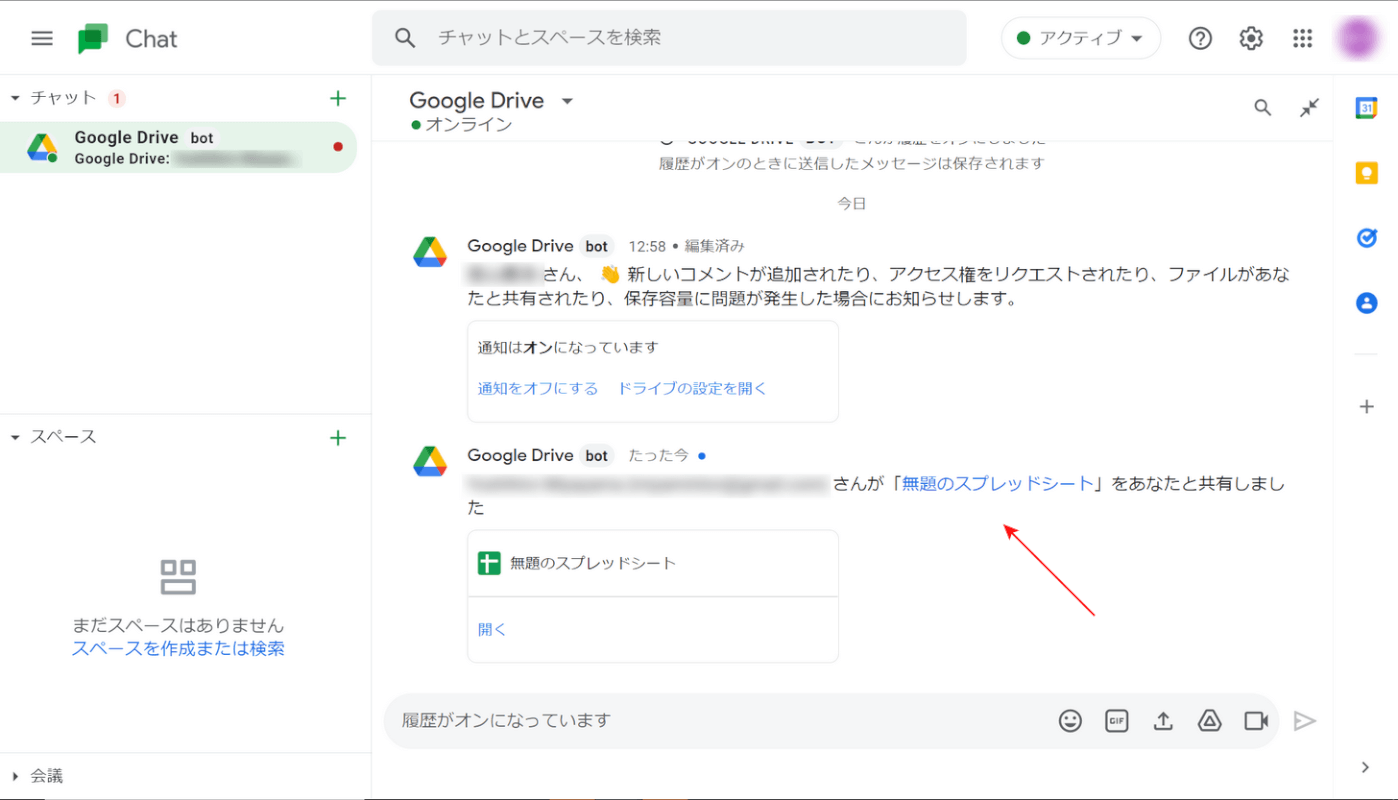
Google スプレッドシートが共有された例をご紹介します。○○(ユーザー名)さんが「○○(共有されたファイル名)」をあなたと共有しました、とGoogle Chatで通知されます。
共有されたスプレッドシートを開く場合は、「開く」をクリックします。
GitHubと連携
Google ChatでGitHub botを使用する方法をご紹介します。Google ChatとGitHubを連携することで、GitHubのリポジトリからの通知をGoogle Chatで受け取ることができます。
事前にGitHubアカウントをご用意ください。
ギットハブの連携のやり方
有料アカウントにログインした状態でGoogle Chatにアクセスし、①「+(チャットを開始)」アイコンをクリックし、②「botを検索」を選択します。
「bot を検索」ダイアログボックスが表示されますので、検索ボックスへ「GitHub bot」と入力します。
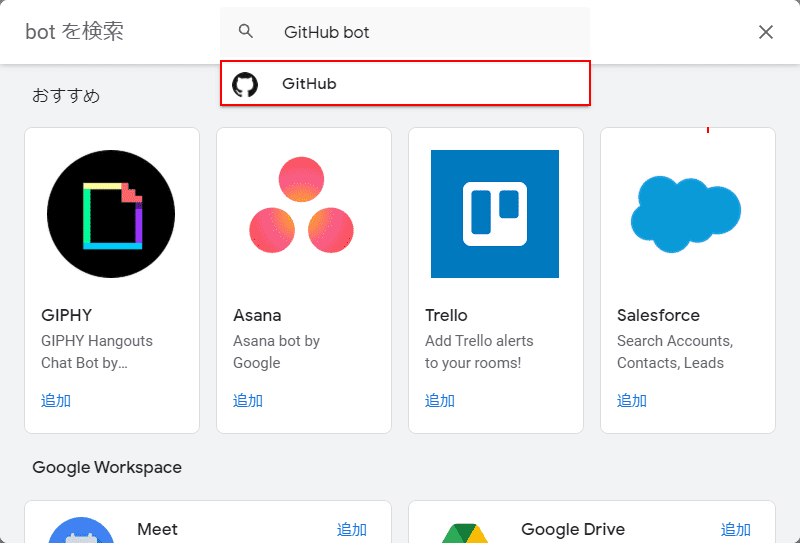
検索結果が表示されますので、「GitHub」を選択します。
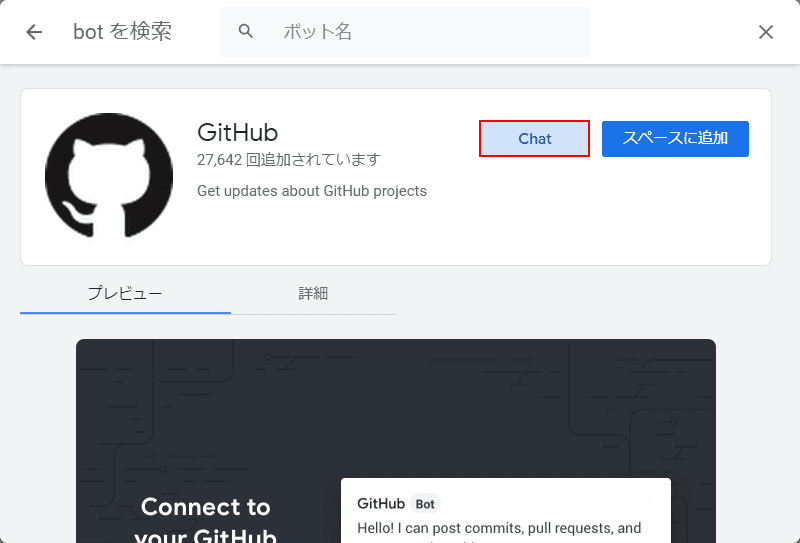
「GitHub」の詳細情報が表示されます。「Chat」ボタンをクリックします。

「GitHub」とのチャットが始まります。すべて英語なので、Google 翻訳を使って和訳してもよいでしょう。
GitHubアカウントにサインインする必要がありますので、青字の「sign in to your GitHub account」をクリックします。
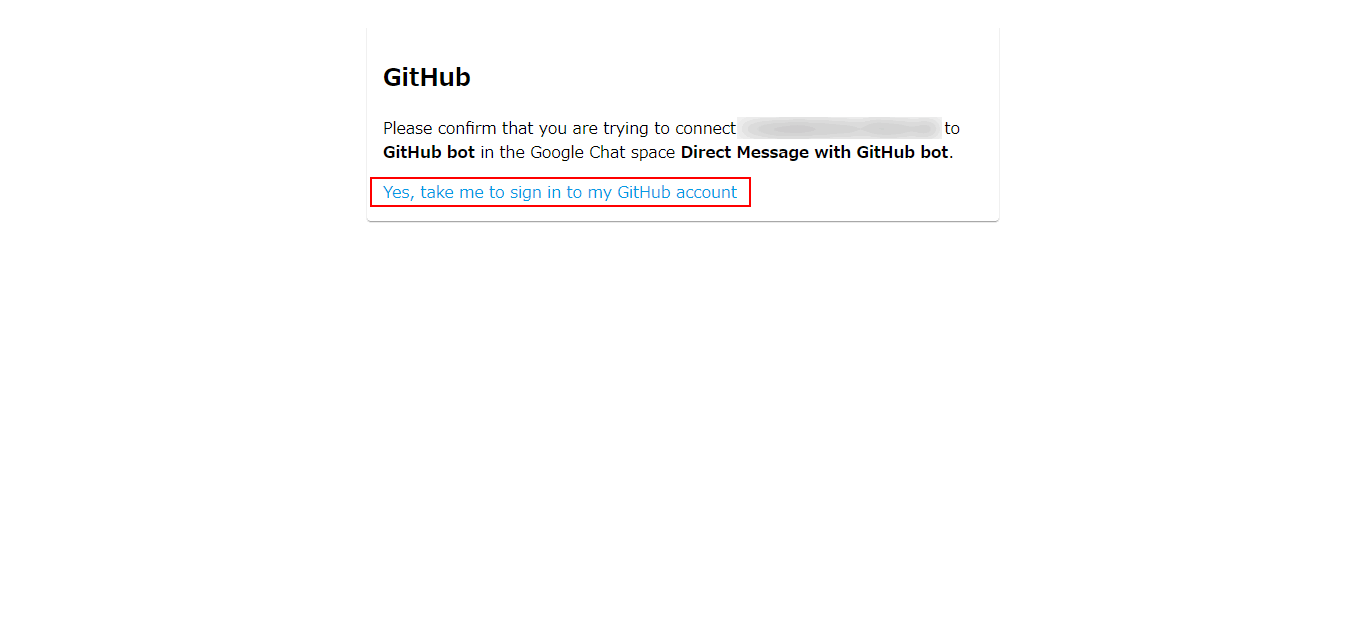
GitHubとの接続確認メッセージが表示されますので、青字の「Yes, take me to sign in to my GitHub account」をクリックします。
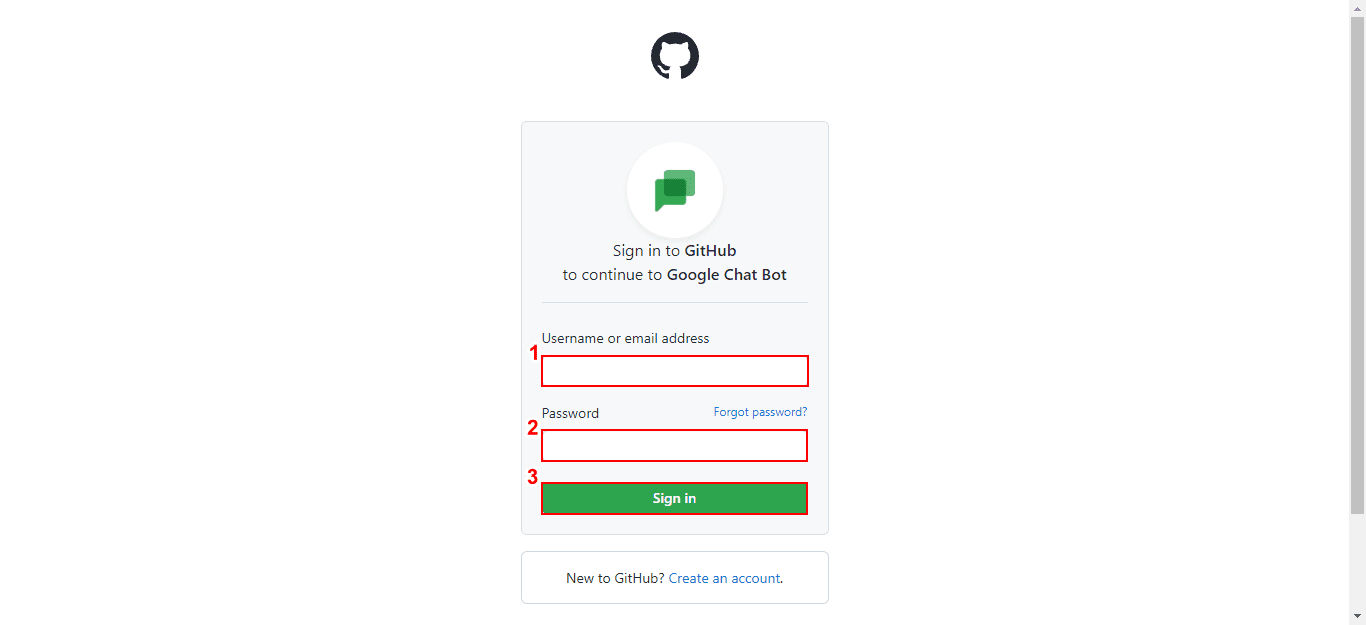
GitHubへのサインイン画面が表示されますので、①「ユーザーネーム」または「メールアドレス」、②「パスワード」を入力し、③「Sign in」ボタンをクリックします。
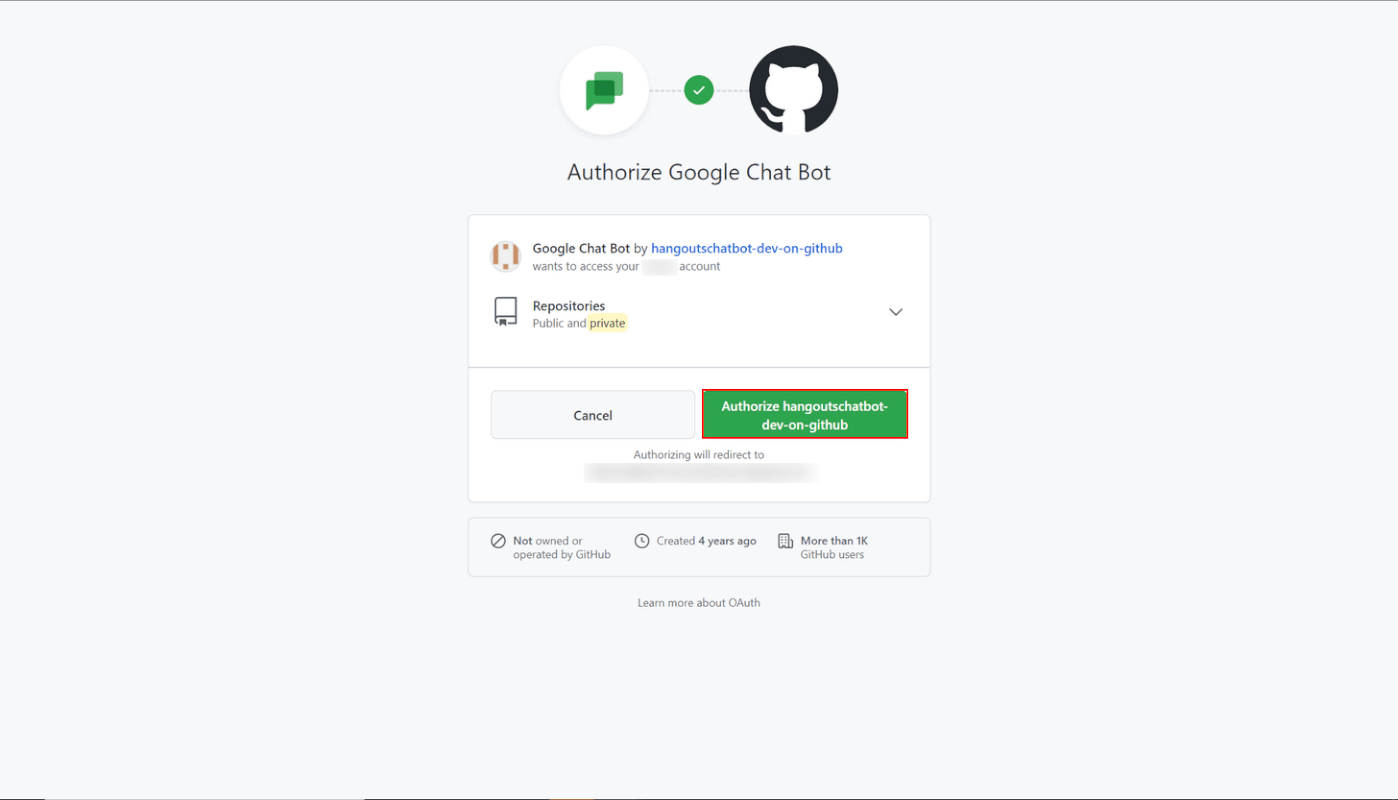
「Authorize Google Chat Bot」画面が表示されます。「Authorize hangoutschatbot-dev-on-github」ボタンをクリックします。

①GitHub Botと接続したいリポジトリを選択し、②「Save」をクリックします。
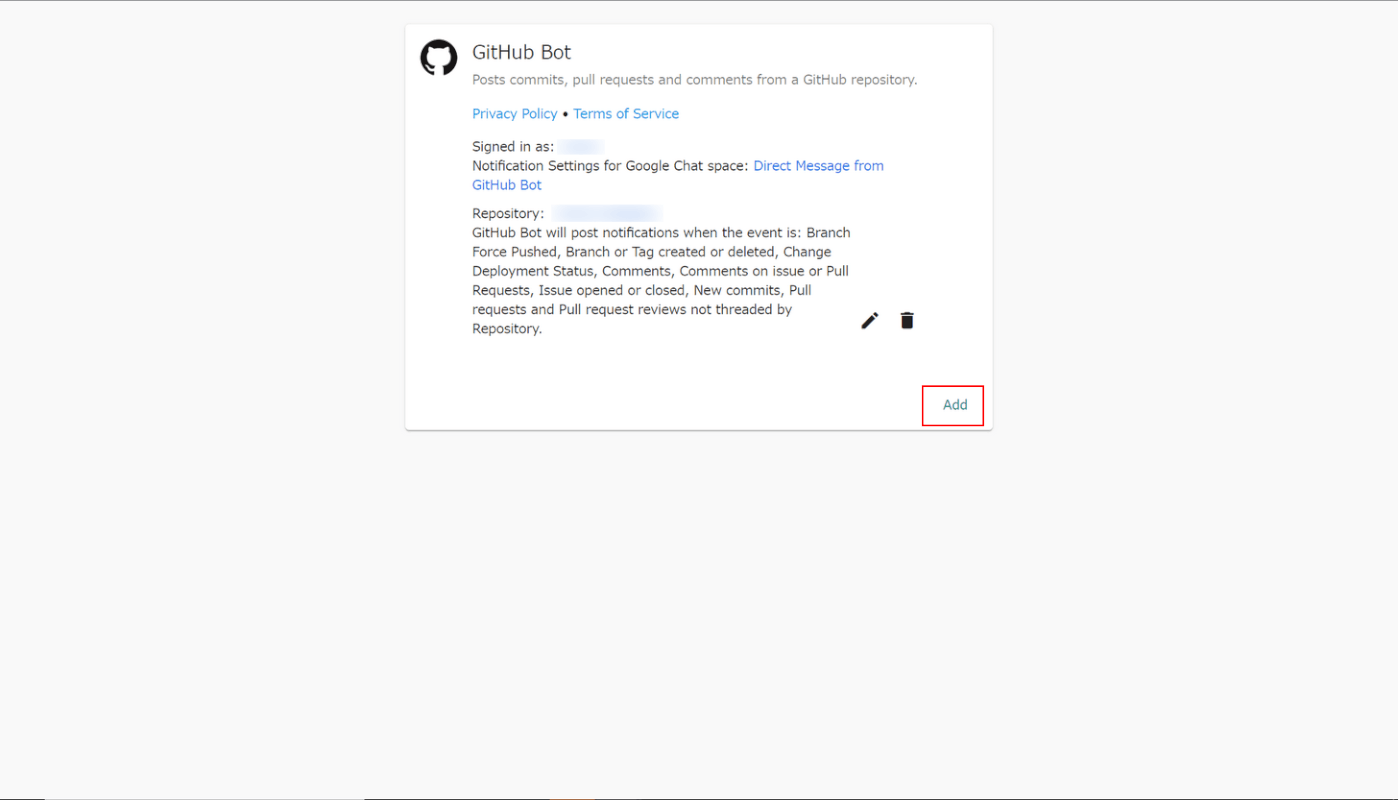
「Add」をクリックします。
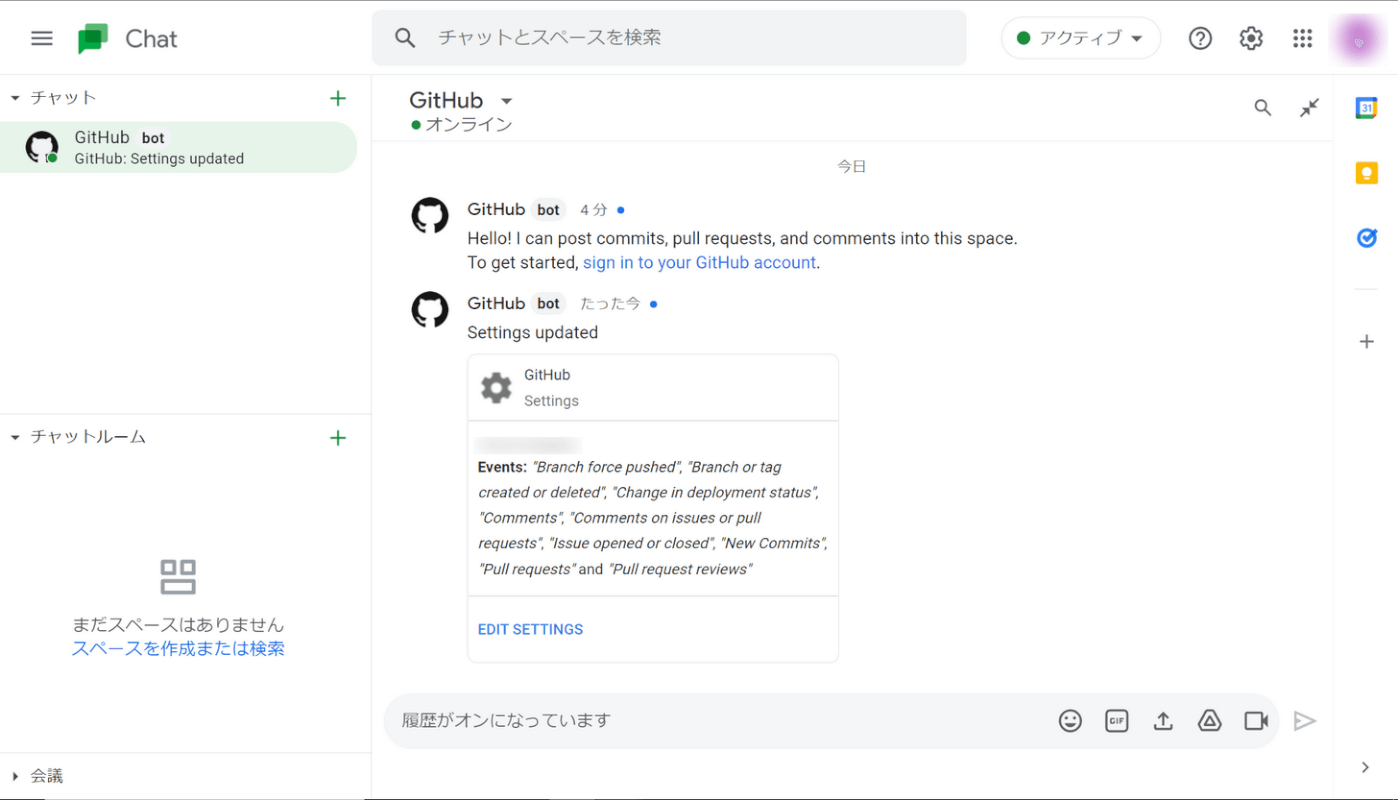
Google ChatとGitHub Botの接続が完了しました。設定が更新された旨が表示されています。
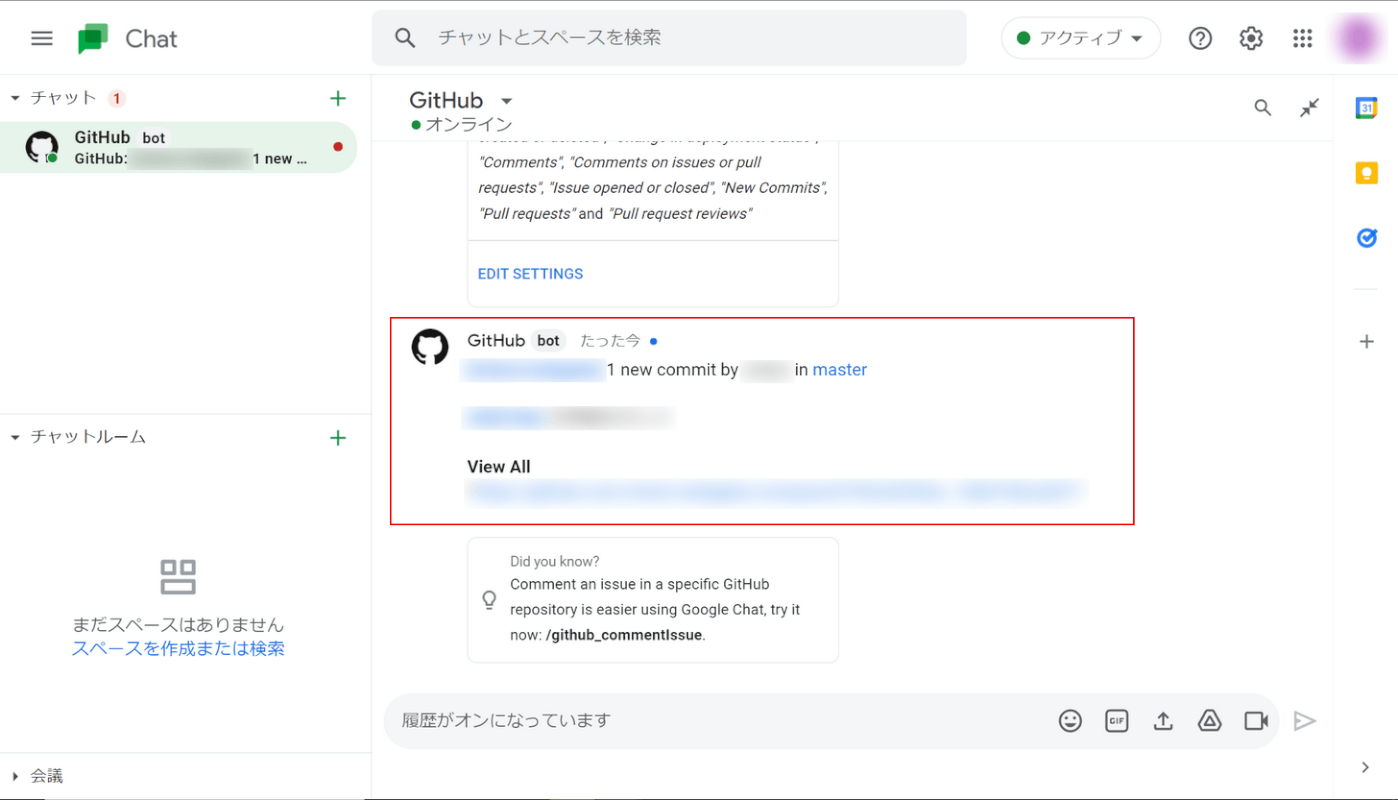
試しにGitHubで接続したリポジトリにコミットしてみましょう。上記のようにGitHub Botからコミットされた旨が通知されました。
Google Chat Botの作成方法
メッセージを送信するとオウム返しするGoogle Chat Botを作成します。「こんにちは」とメッセージを送ると「こんにちは」と返してくれるbotを作ってみましょう。
Google Chat Botを作成するには、Google ChatにアクセスできるGoogle Workspaceアカウントが必要になります。
Google Chat Botを作成する流れとしては以下の通りです。
- Google Cloud Platformでプロジェクトを作成する
- Google Chat APIを有効にする
- OAuth 同意画面を設定する
- Apps Scriptテンプレートを開く
- デプロイIDを取得する
- Google Cloud PlatformでBotを公開する
Google Cloud Platformでプロジェクトを作成する
Google Cloud Platform(GCP)で新しいプロジェクトを作成します。
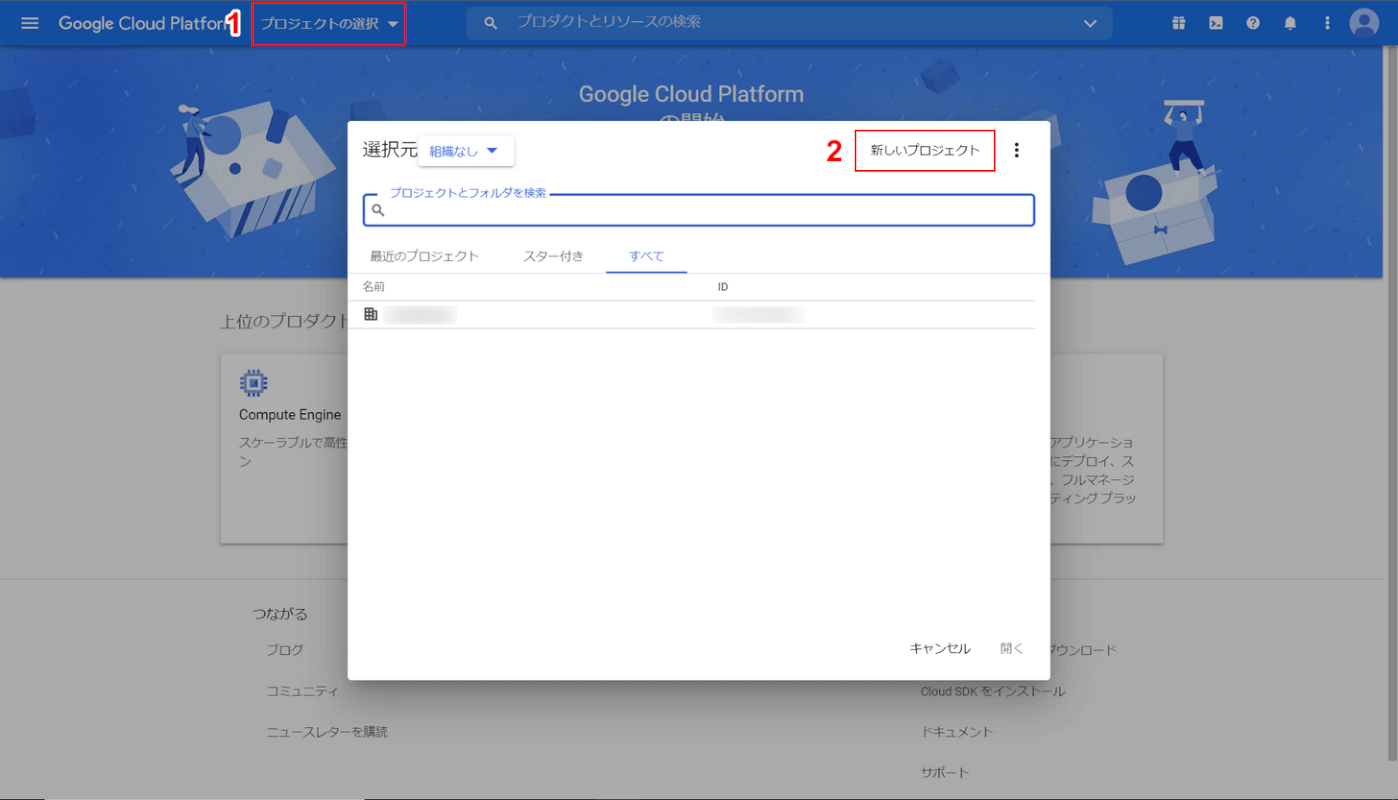
Google Cloud Platformにアクセスし、①「プロジェクトの選択」、②「新しいプロジェクト」の順に選択します。
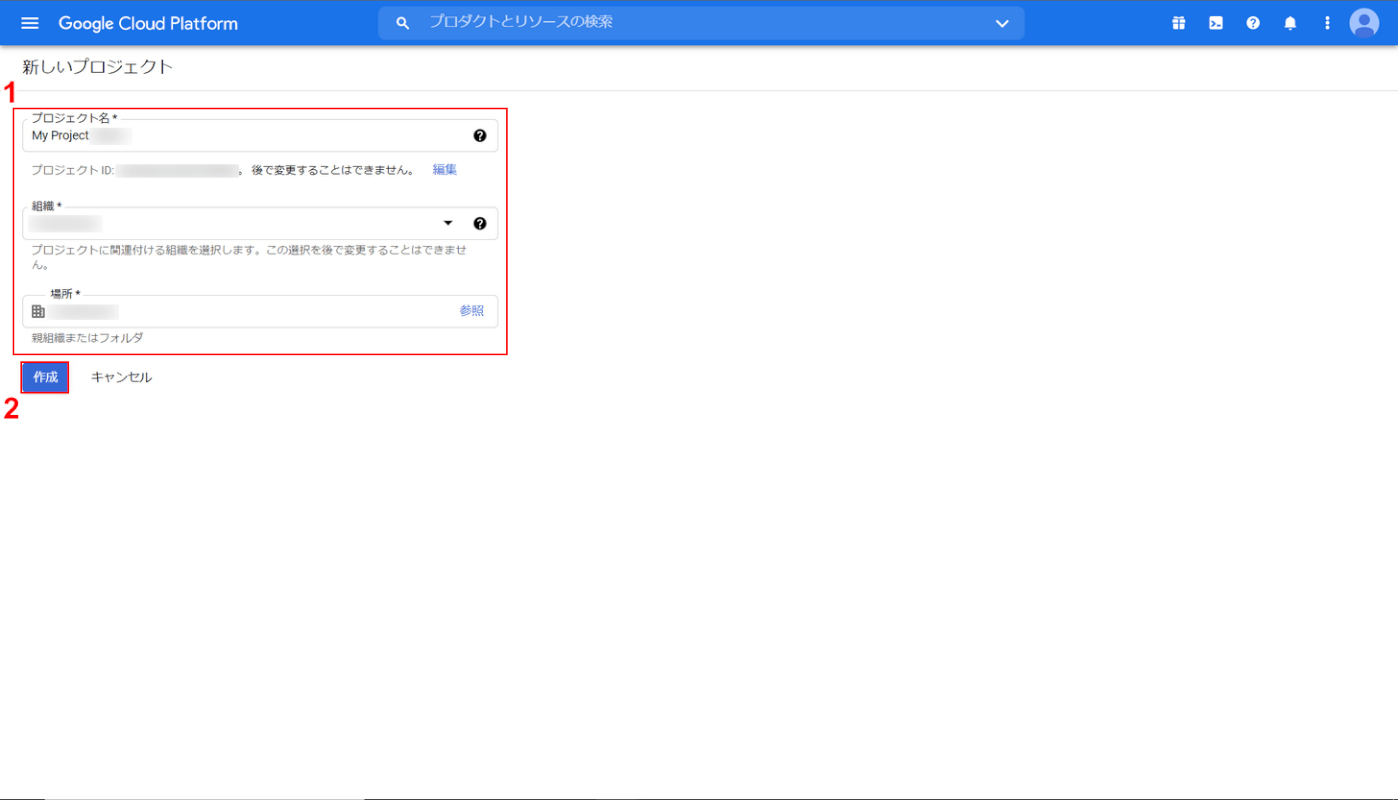
①プロジェクト名や組織、場所を指定し、②「作成」ボタンをクリックします。
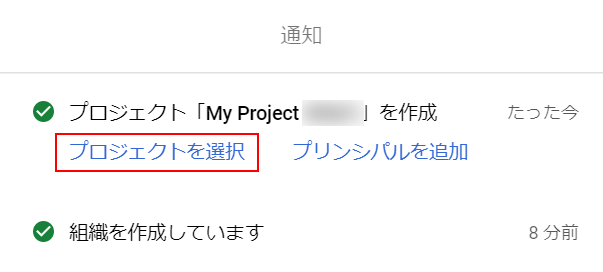
プロジェクトが作成された旨がポップアップで通知されます。「プロジェクトを選択」をクリックします。
Google Chat APIを有効にする
新しいプロジェクトを作成したらGoogle Chat APIを有効にします。
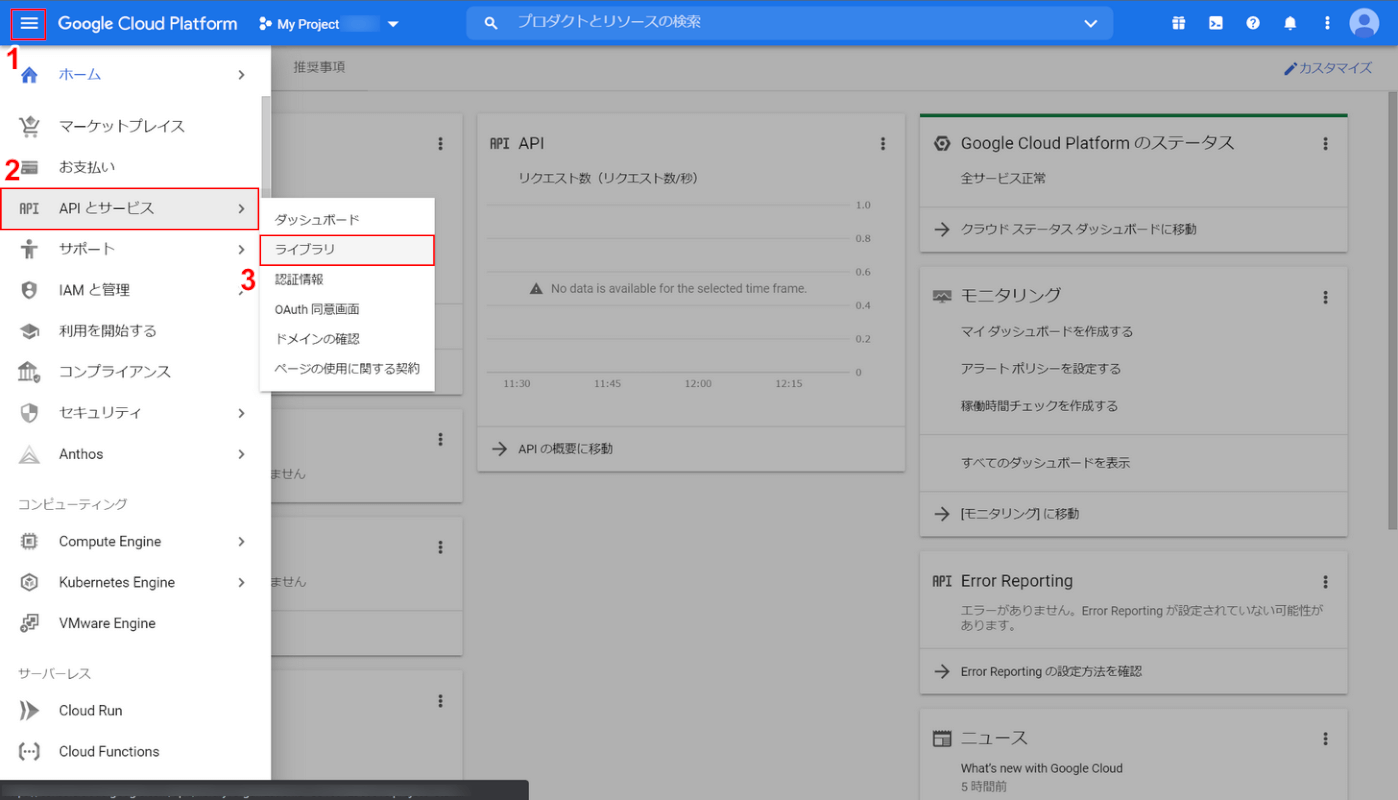
①「ナビゲーションメニュー」、②「APIとサービス」、③「ライブラリ」の順に選択します。
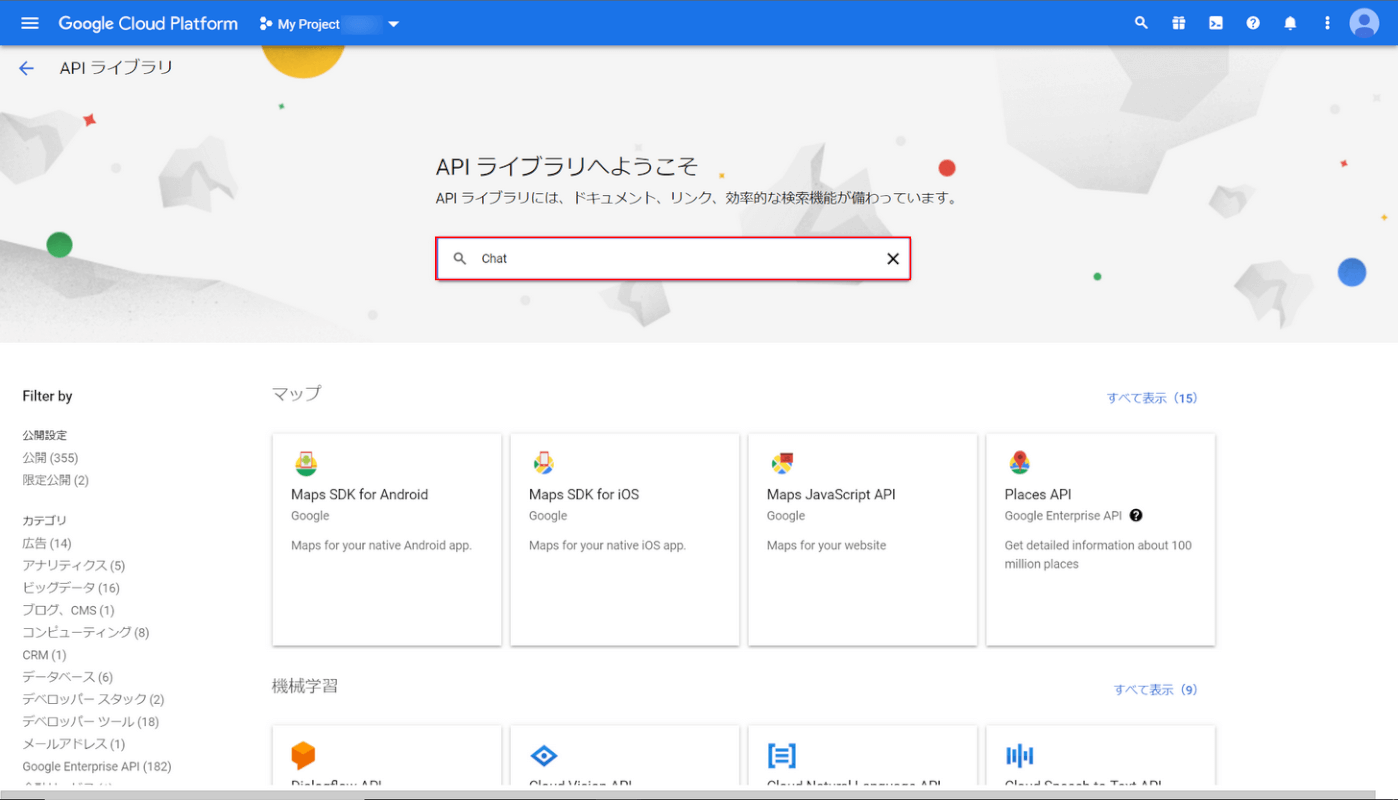
APIライブラリが表示されます。検索ボックスに「Chat」と入力し、「Enter」キーを押します。
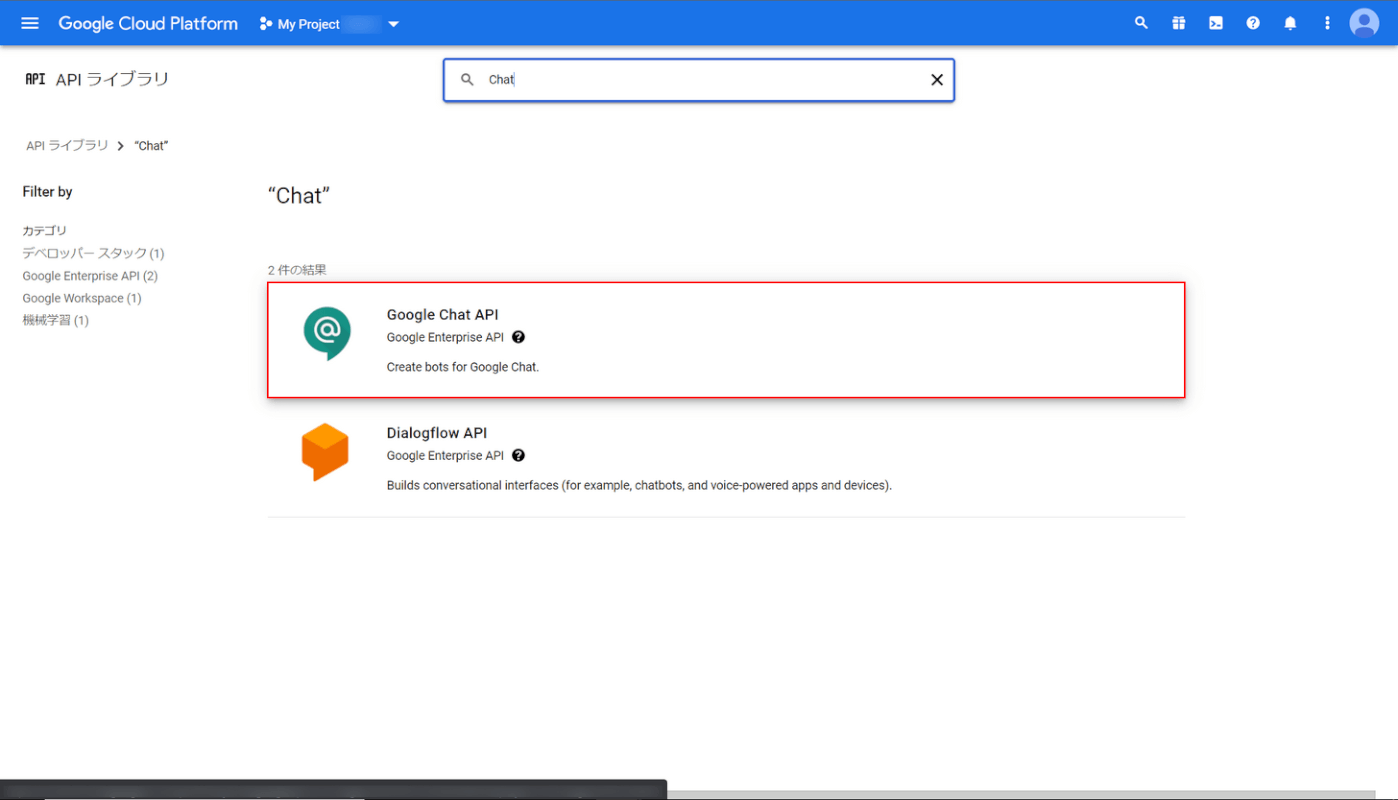
検索結果が表示されます。検索結果から「Google Chat API」を選択します。
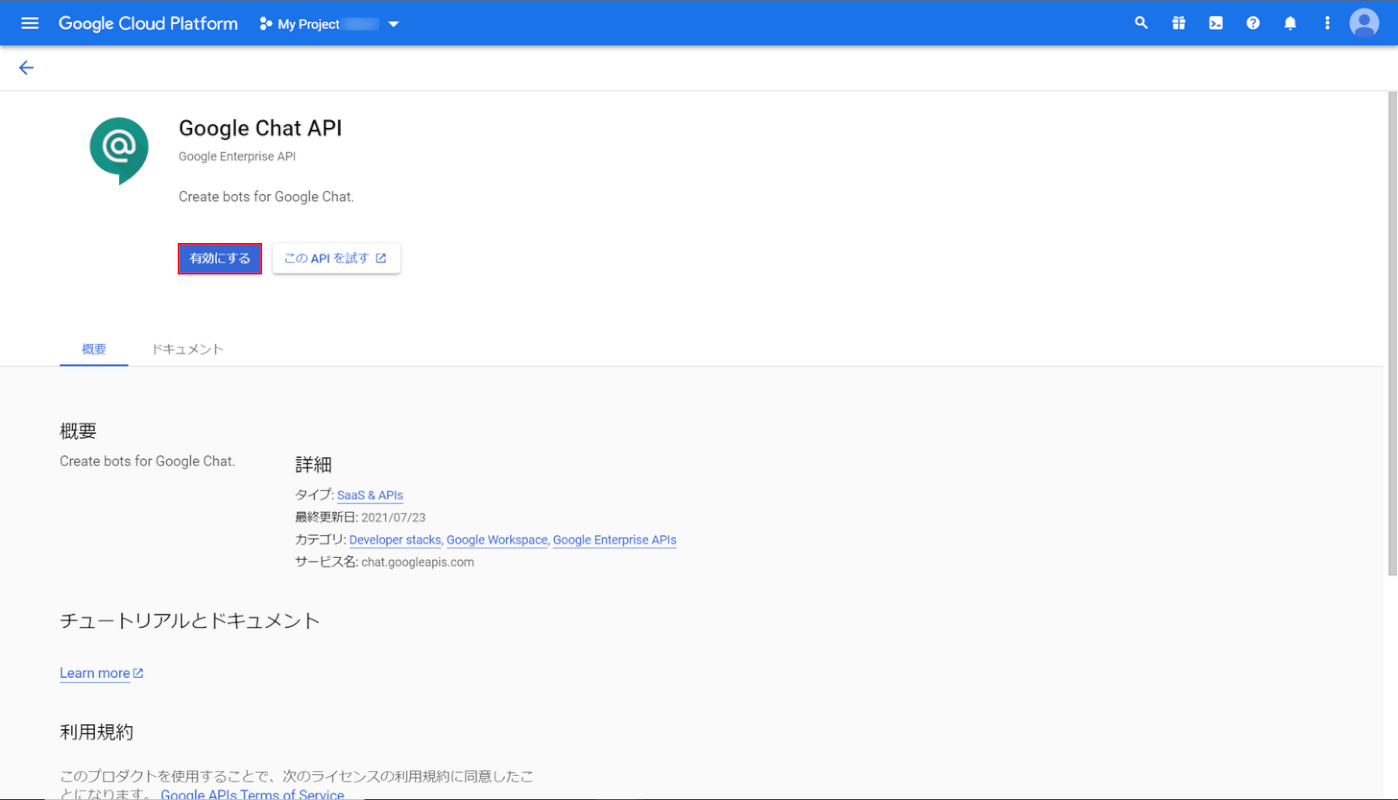
Google Chat APIの詳細が表示されます。「有効にする」ボタンをクリックします。
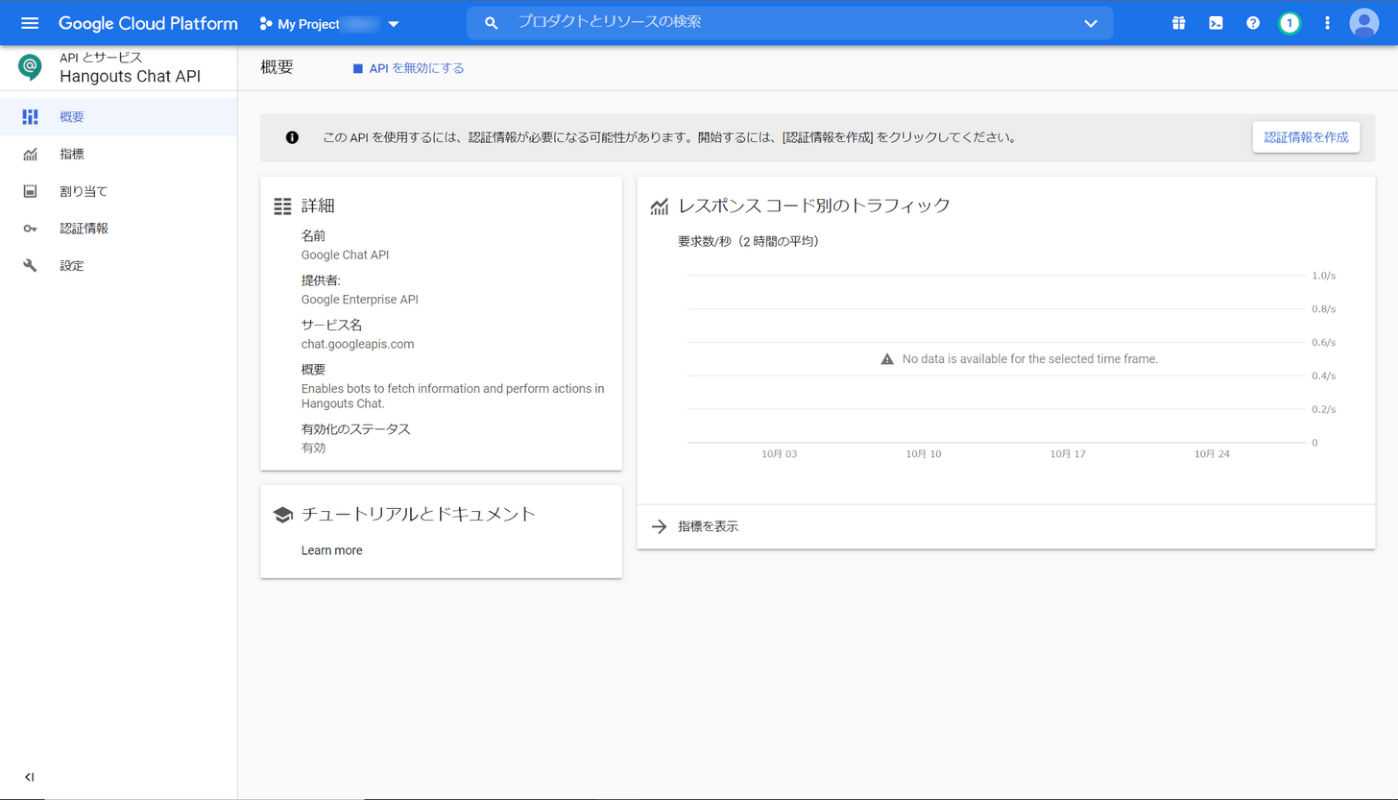
Google Chat APIが有効になりました。Google Chat APIの概要画面に切り替わります。
OAuth 同意画面を設定する
Google Chat APIを有効にしたらOAuth 同意画面を設定します。Google Chat APIを使用するためにはアプリの名前やサポート先を登録する必要があります。
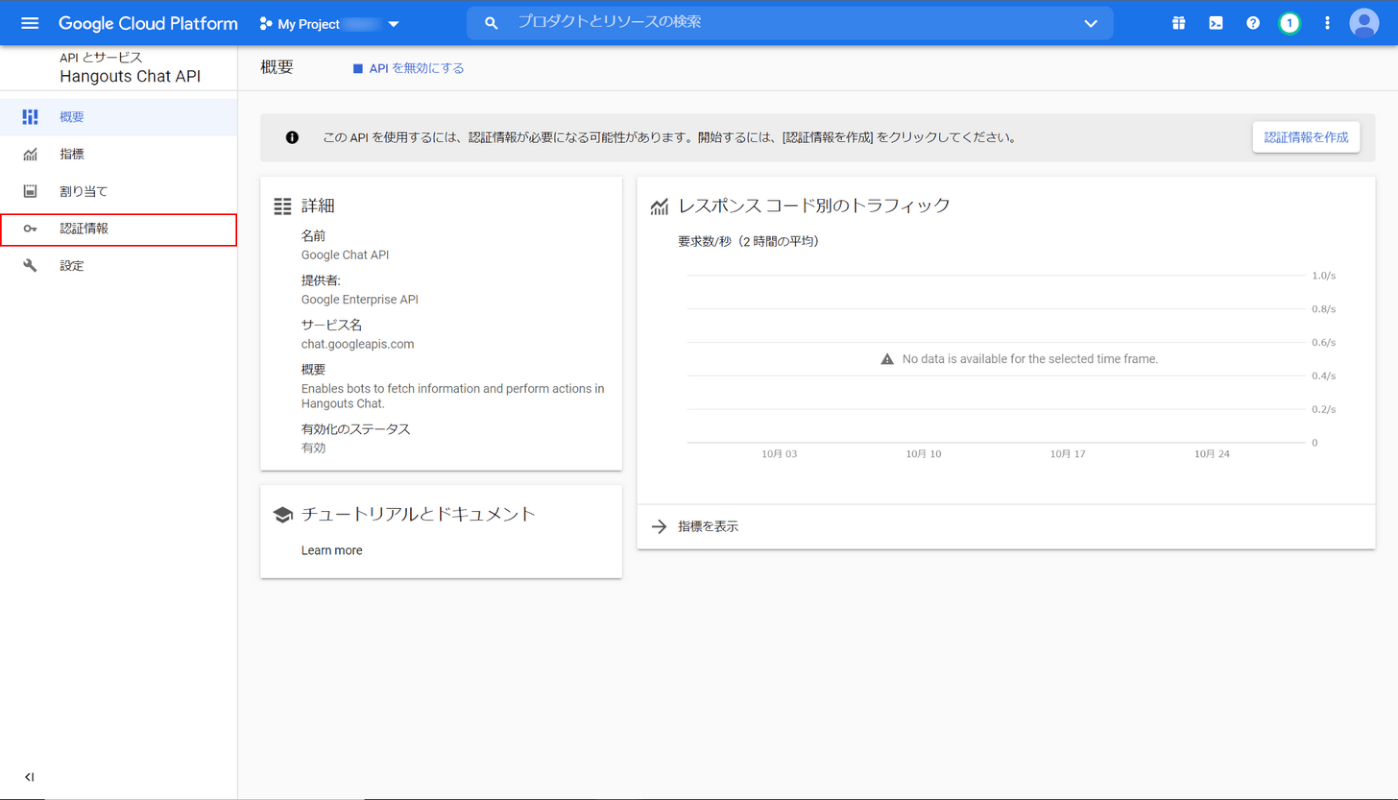
左のナビゲーションから「認証情報」を選択します。
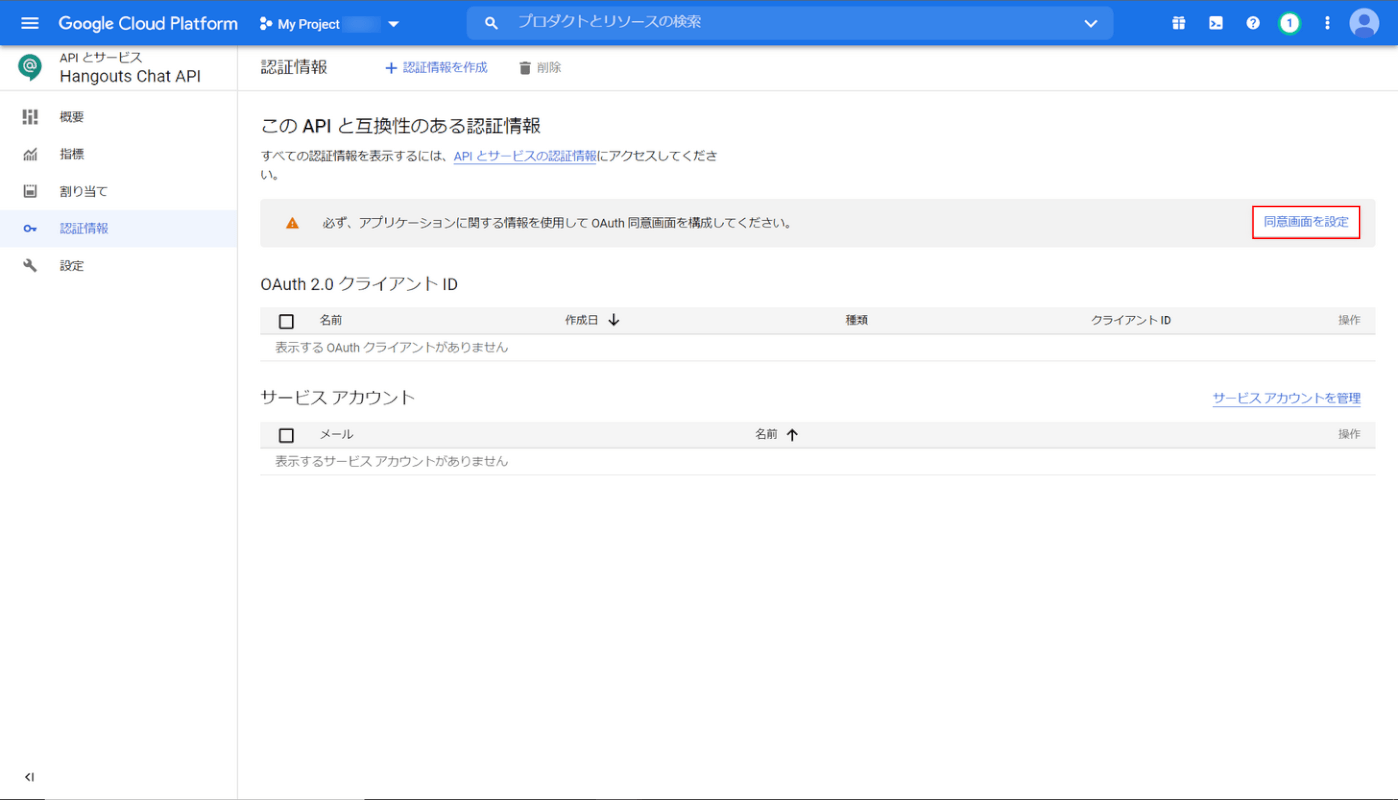
「同意画面を設定」ボタンをクリックします。
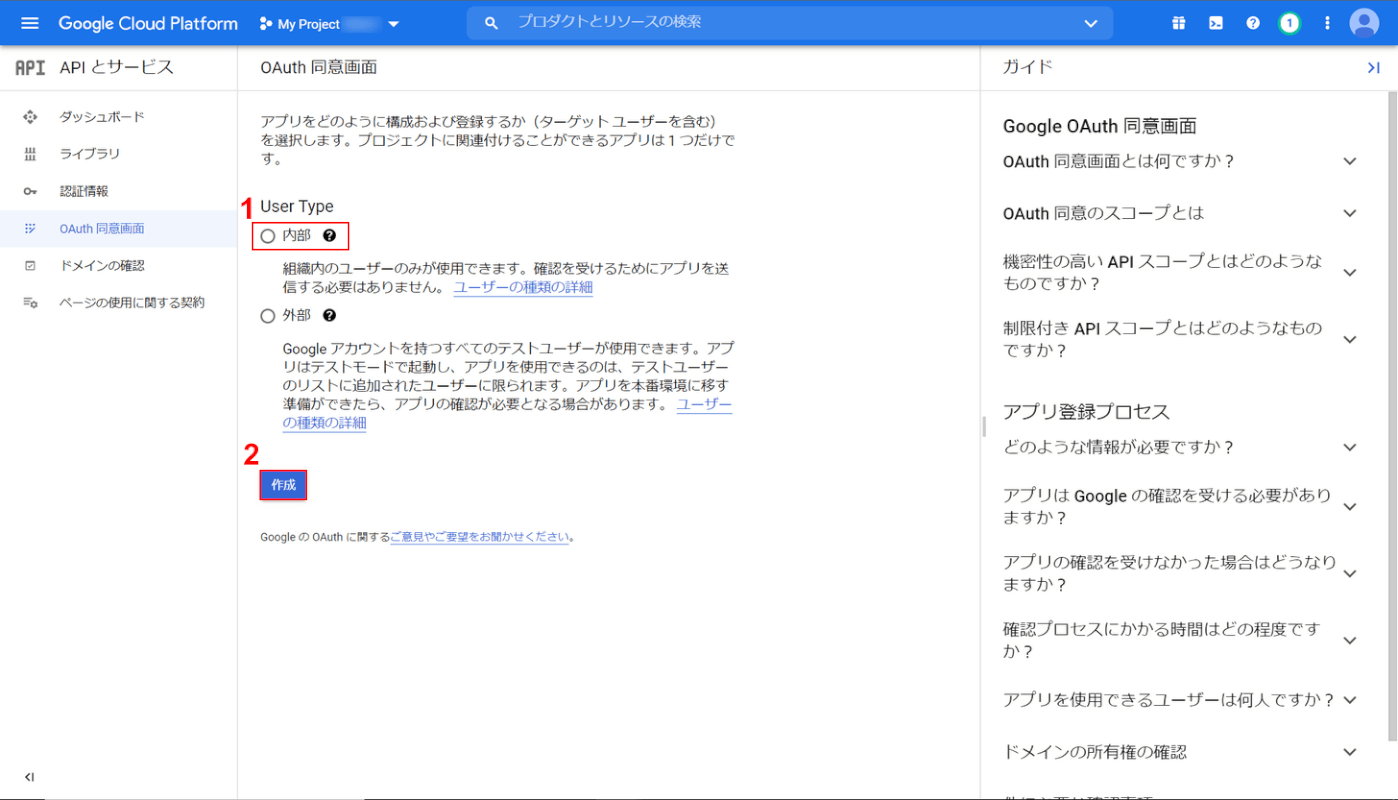
OAuth 同意画面が開きます。アプリをどのように登録するか選択します。今回は組織内のユーザーのみが使用できるようにするため「内部」にします。
①「User Type(例:内部)」を選択し、②「作成」ボタンをクリックします。
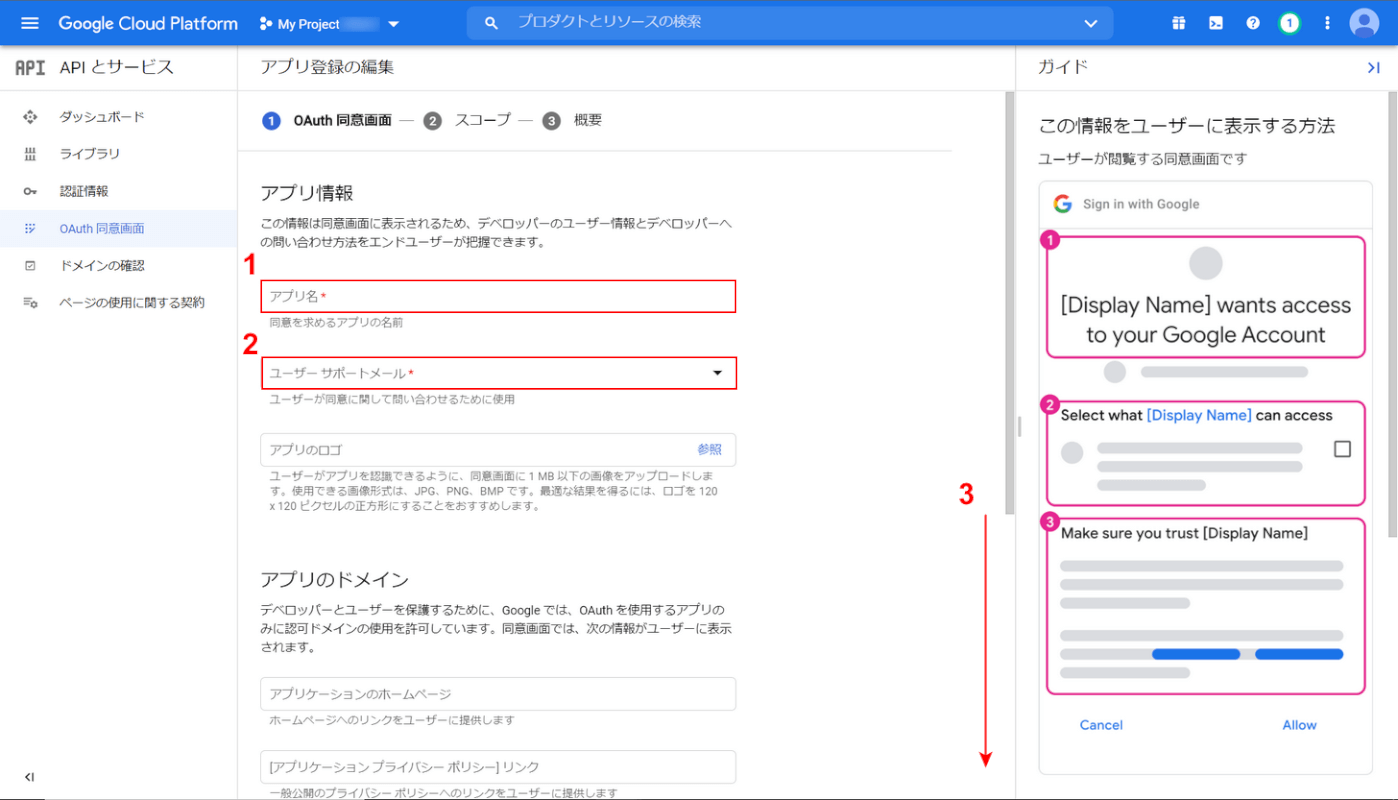
アプリ情報を編集します。①「アプリ名」を入力し、②「ユーザーサポートメール」を選択します。③下にスクロールします。
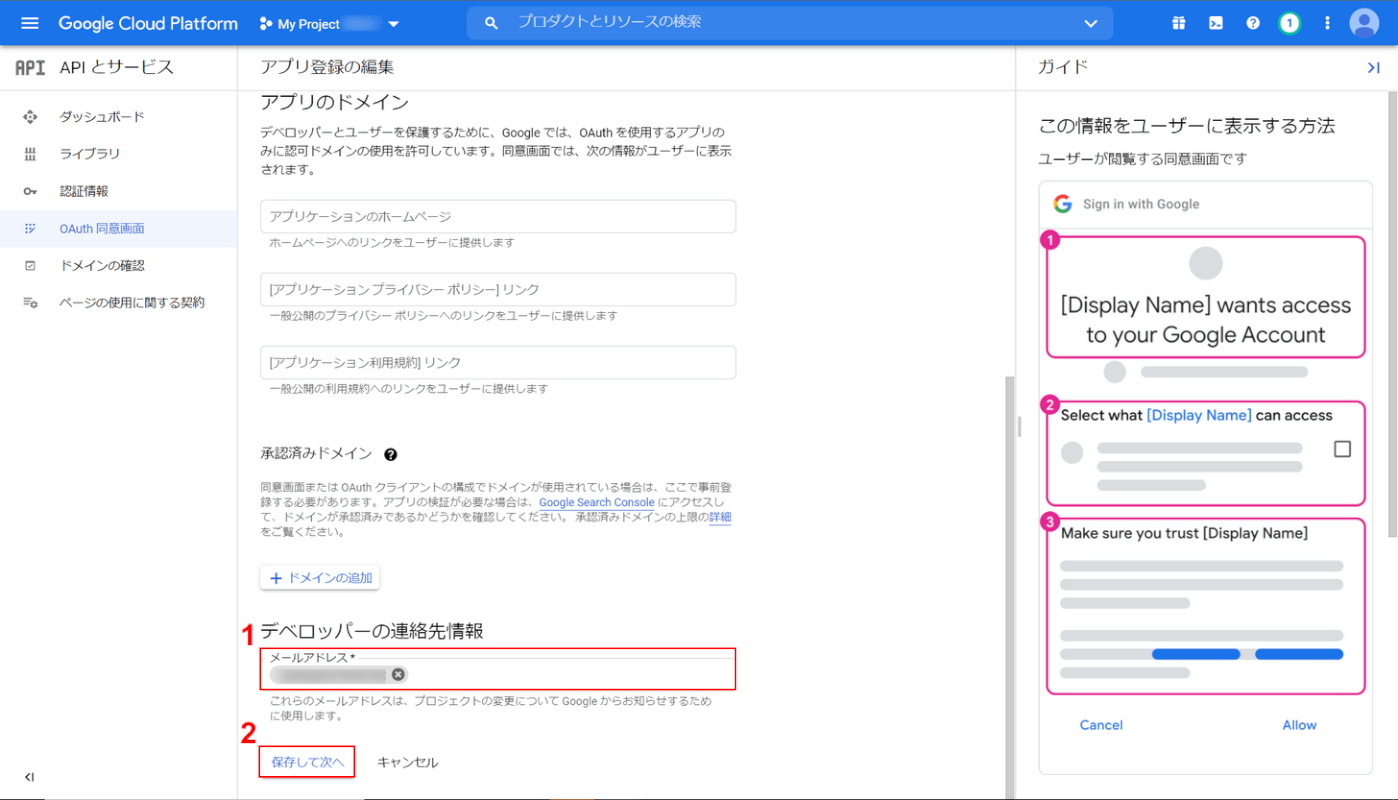
①デベロッパーの連絡先情報としてメールアドレスを入力し、②「保存して次へ」ボタンをクリックします。
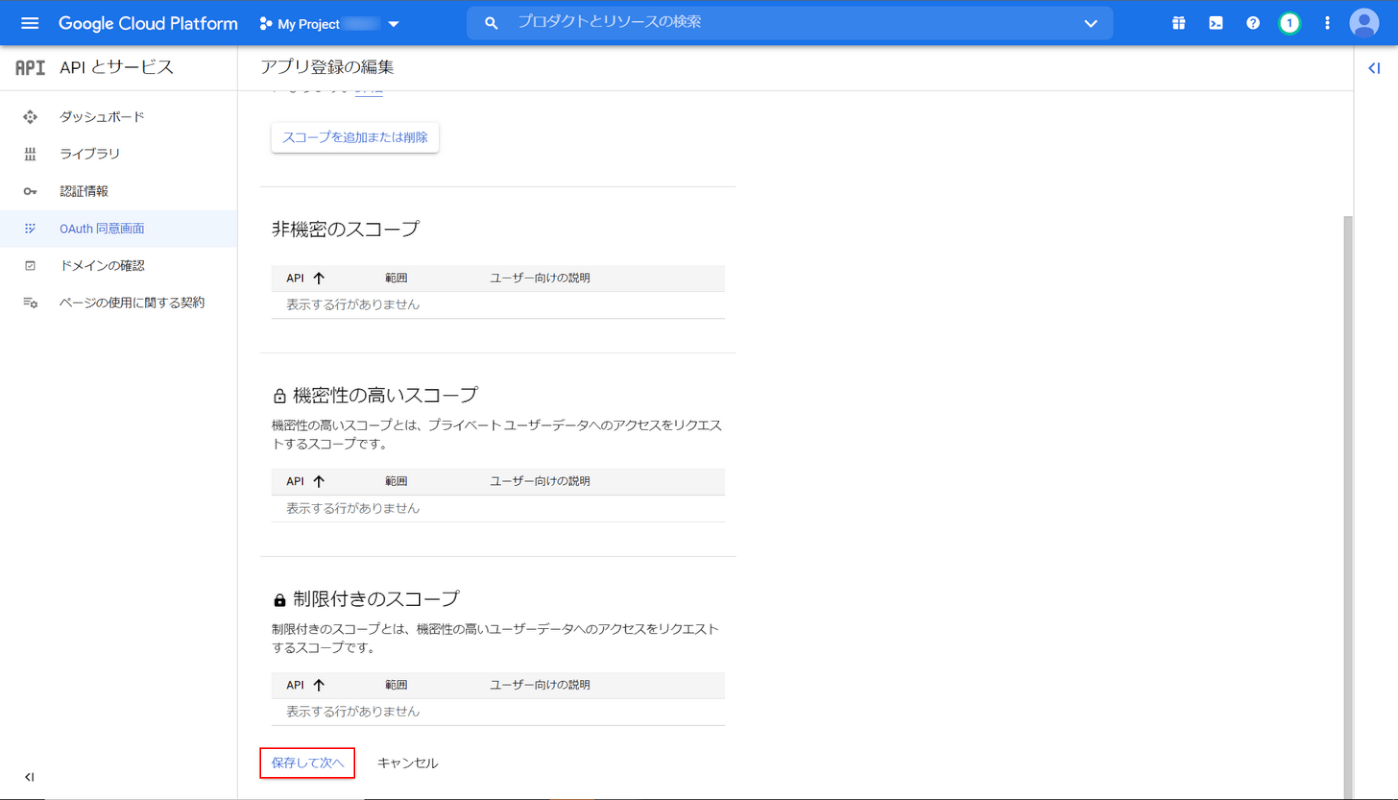
スコープとは、アプリのユーザーに許可を求める権限のことです。スコープを設定すると、Google アカウントにある特定のユーザーデータにアクセスができます。
今回は必要ないのでスコープを追加せず次に進みます。「保存して次へ」ボタンをクリックします。
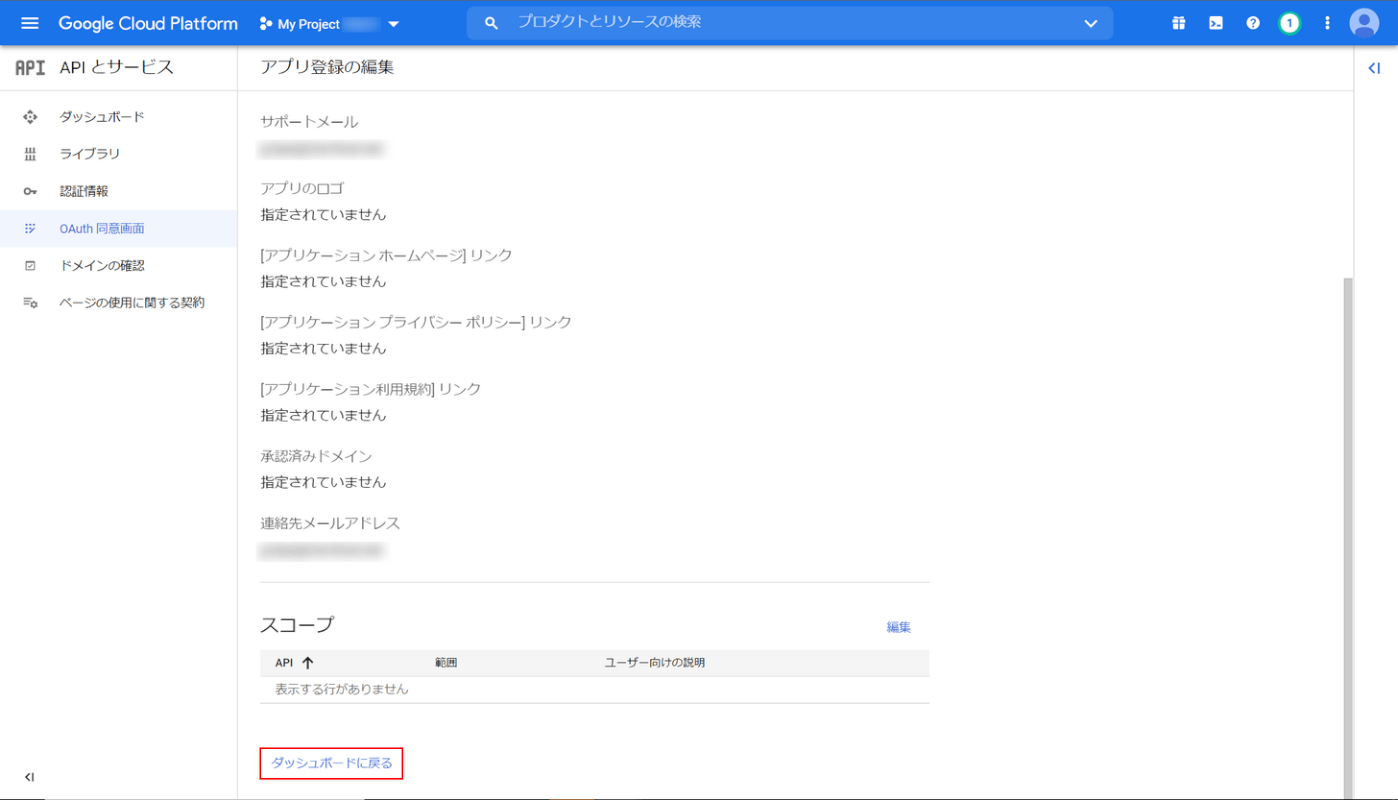
編集した情報の概要が表示されます。内容を確認して問題なければ「ダッシュボードに戻る」ボタンをクリックします。
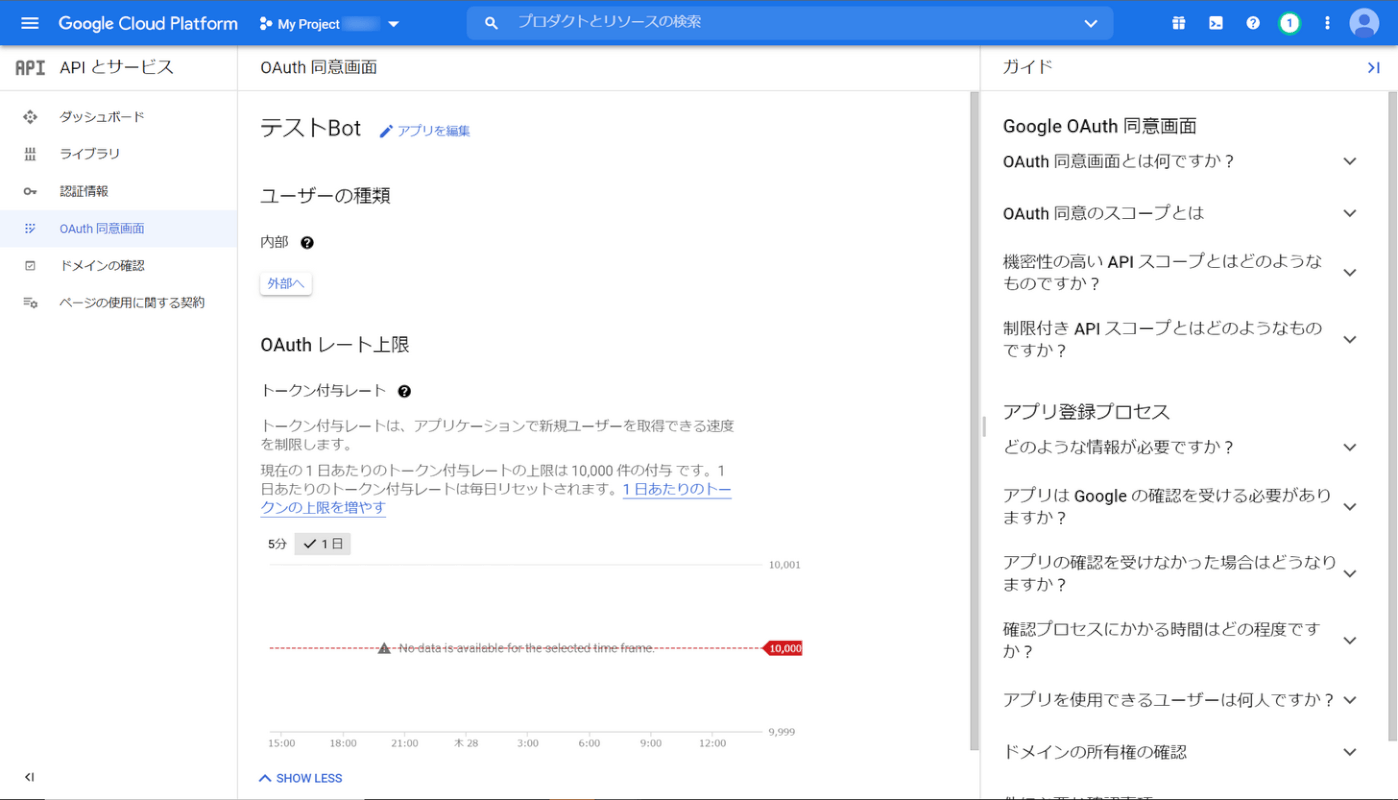
OAuth 同意画面の設定が完了しました。
Apps Scriptテンプレートを開く
Apps Scriptテンプレートには、Google Chat Botのテンプレートがあります。今回はテンプレートを使ってGoogle Chat Botを作成してみましょう。
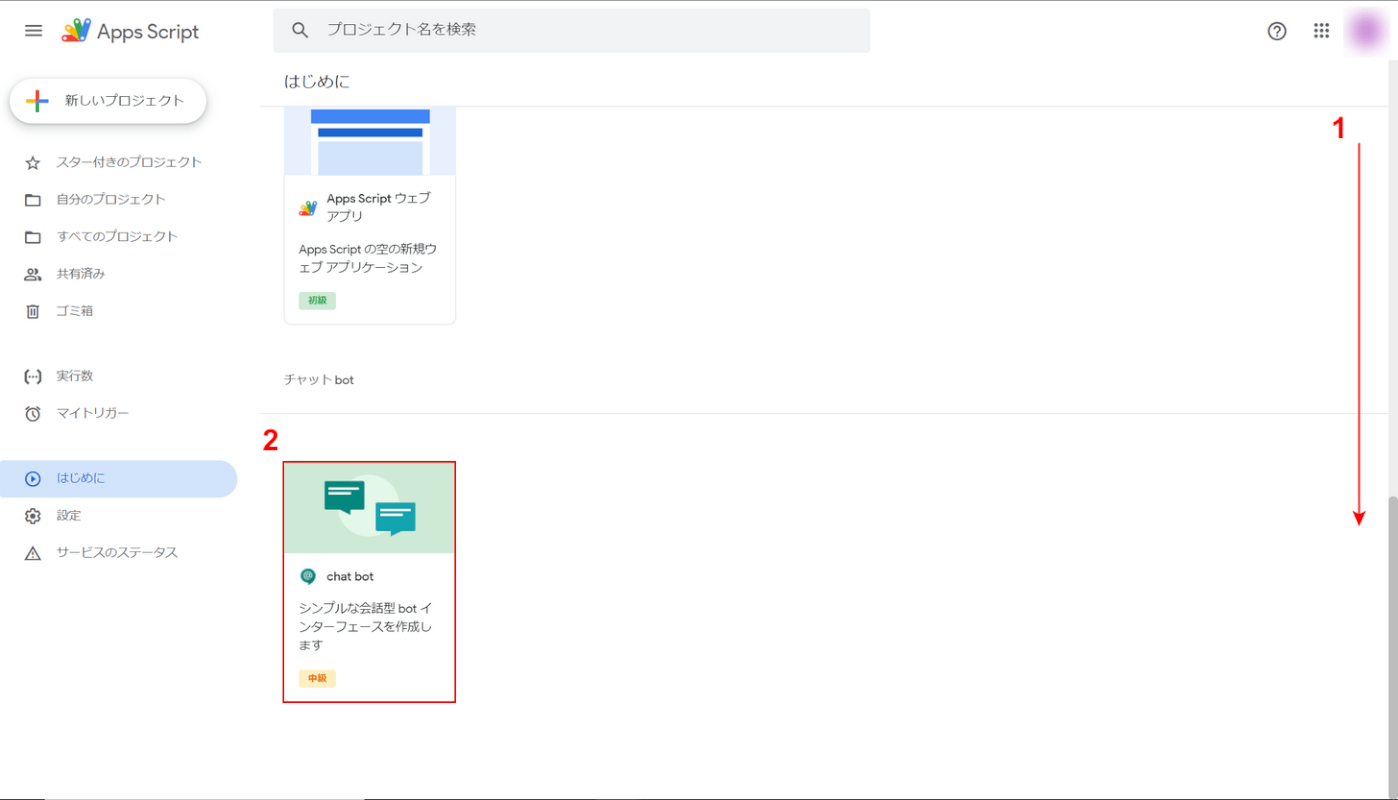
Apps Scriptにアクセスします。①ページを下にスクロールし、②「chat bot」をクリックします。
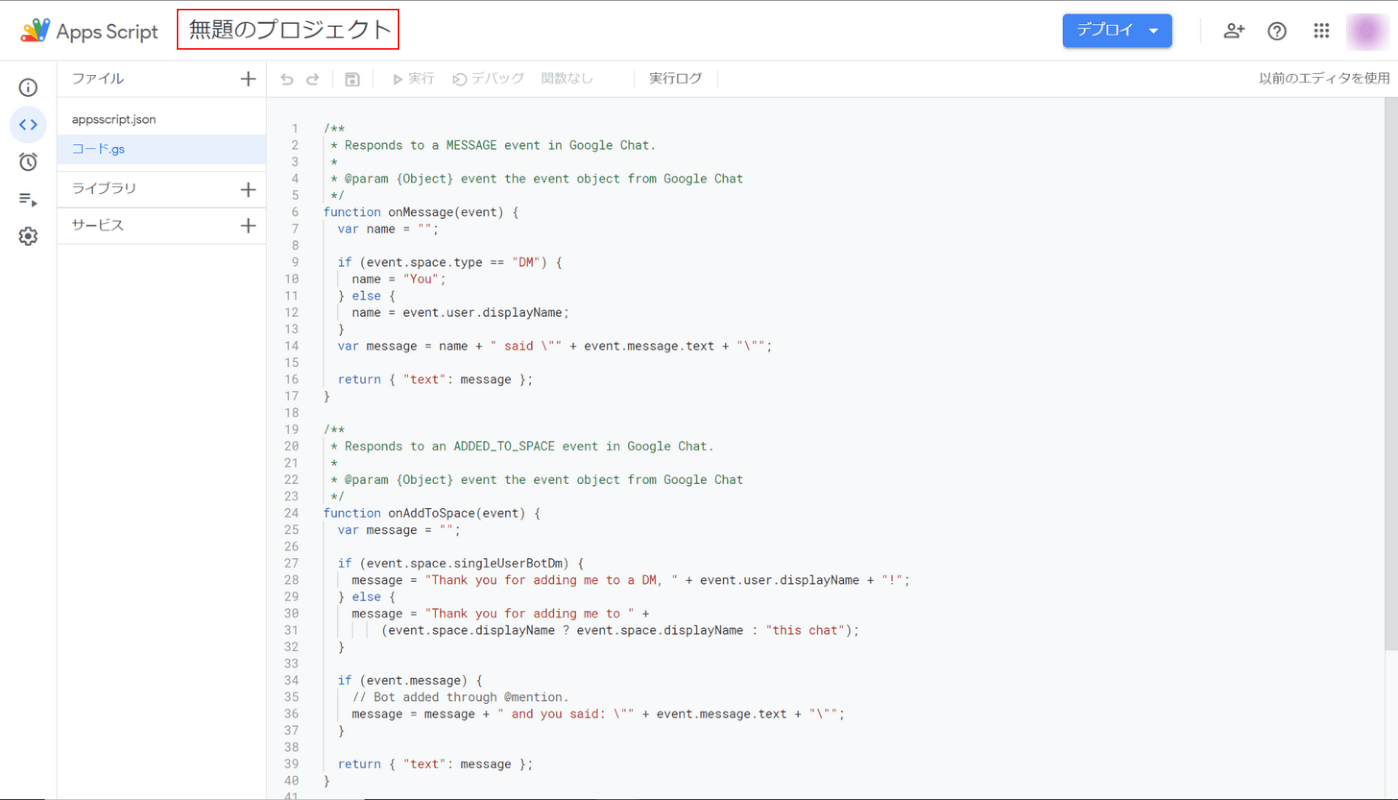
Apps Scriptのエディタ画面が表示されます。「無題のプロジェクト」をクリックします。
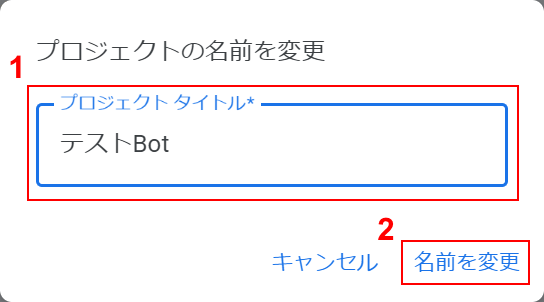
「プロジェクトの名前を変更」ダイアログボックスが表示されます。①「プロジェクトタイトル(例:テストBot)」を入力し、②「名前を変更」を選択します。
デプロイIDを取得する
Google Chat APIを有効にしたGoogle Cloud PlatformのプロジェクトとApps Scriptプロジェクトを紐づける必要があります。
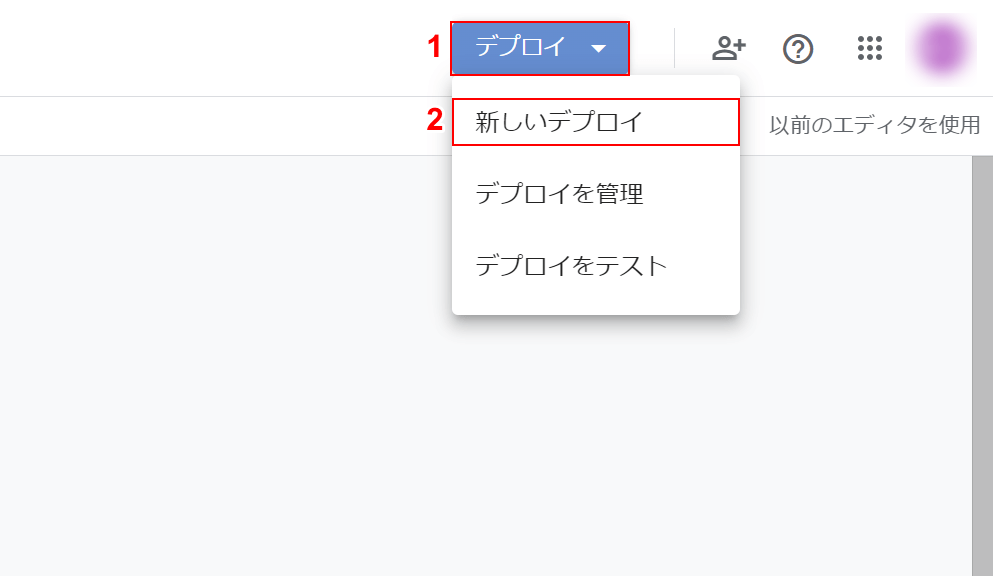
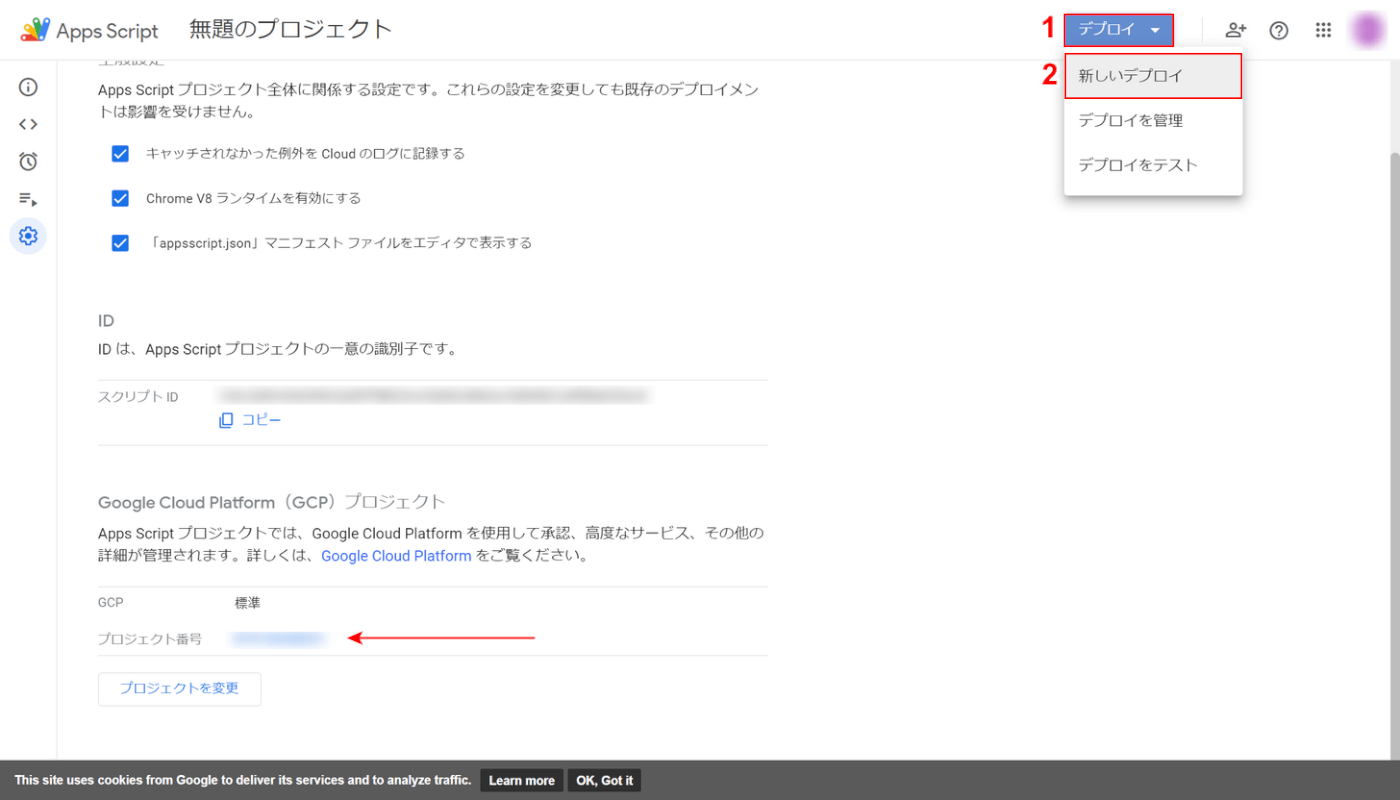
①「デプロイ」、②「新しいデプロイ」の順に選択します。
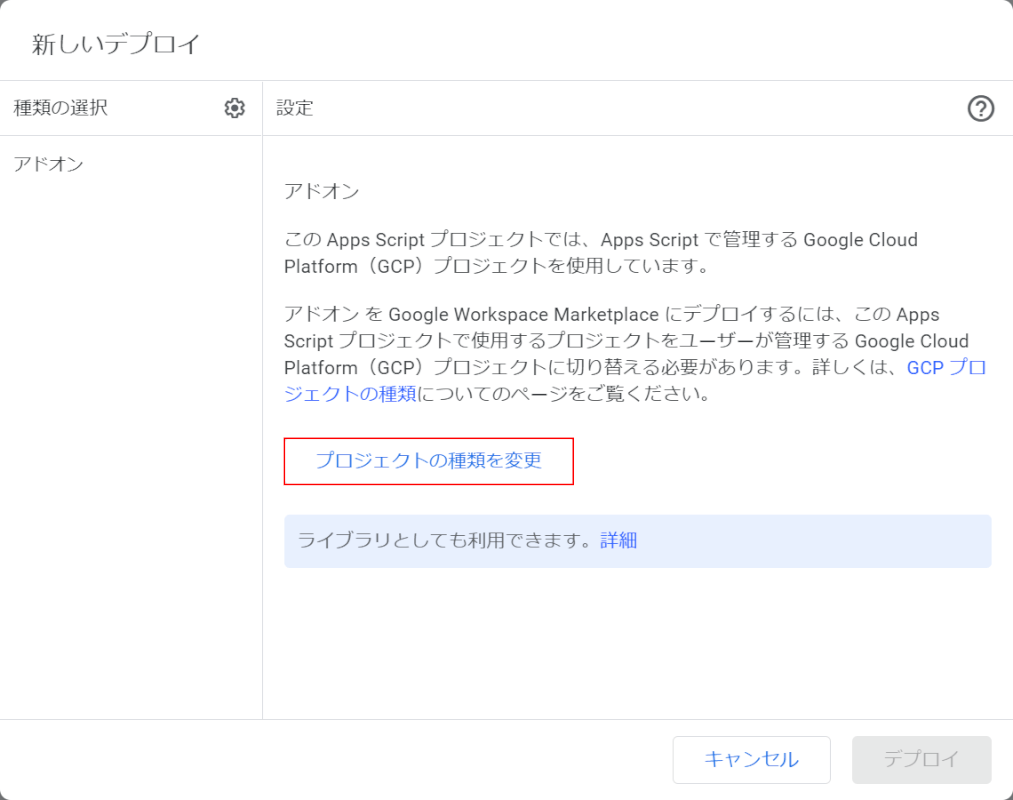
「新しいデプロイ」ダイアログボックスが表示されます。「プロジェクトの種類を変更」ボタンをクリックします。
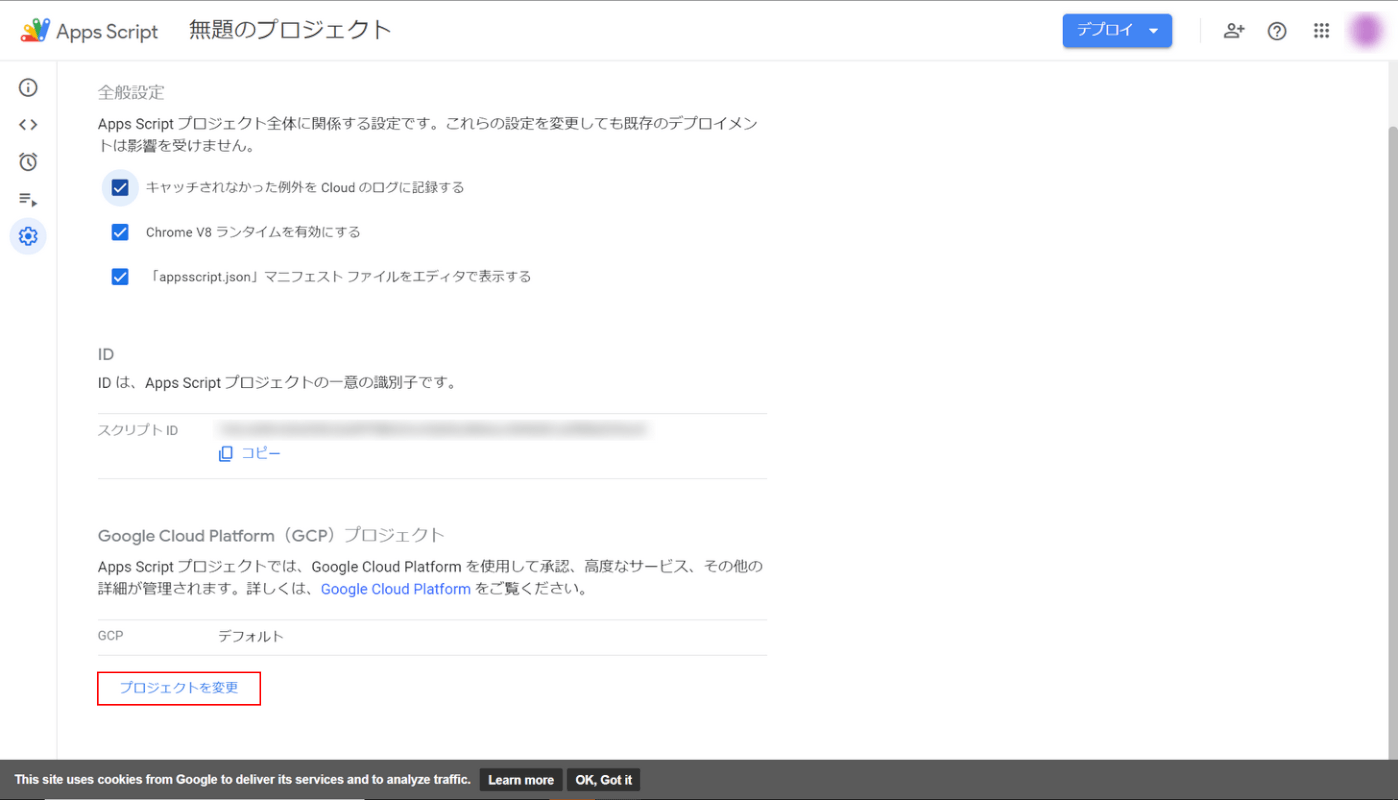
「プロジェクトを変更」ボタンをクリックします。
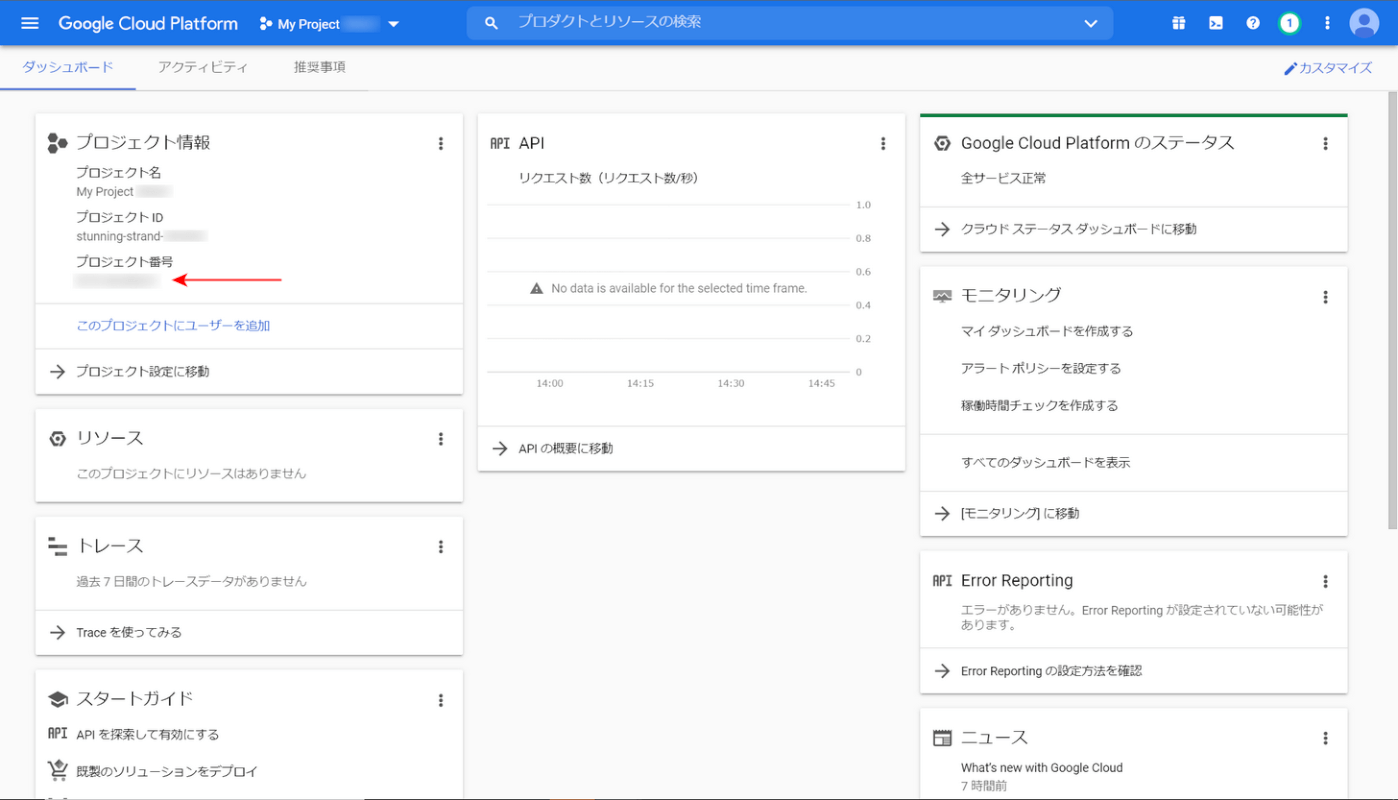
Google Cloud Platformのダッシュボードにアクセスします。プロジェクト番号をコピーします。
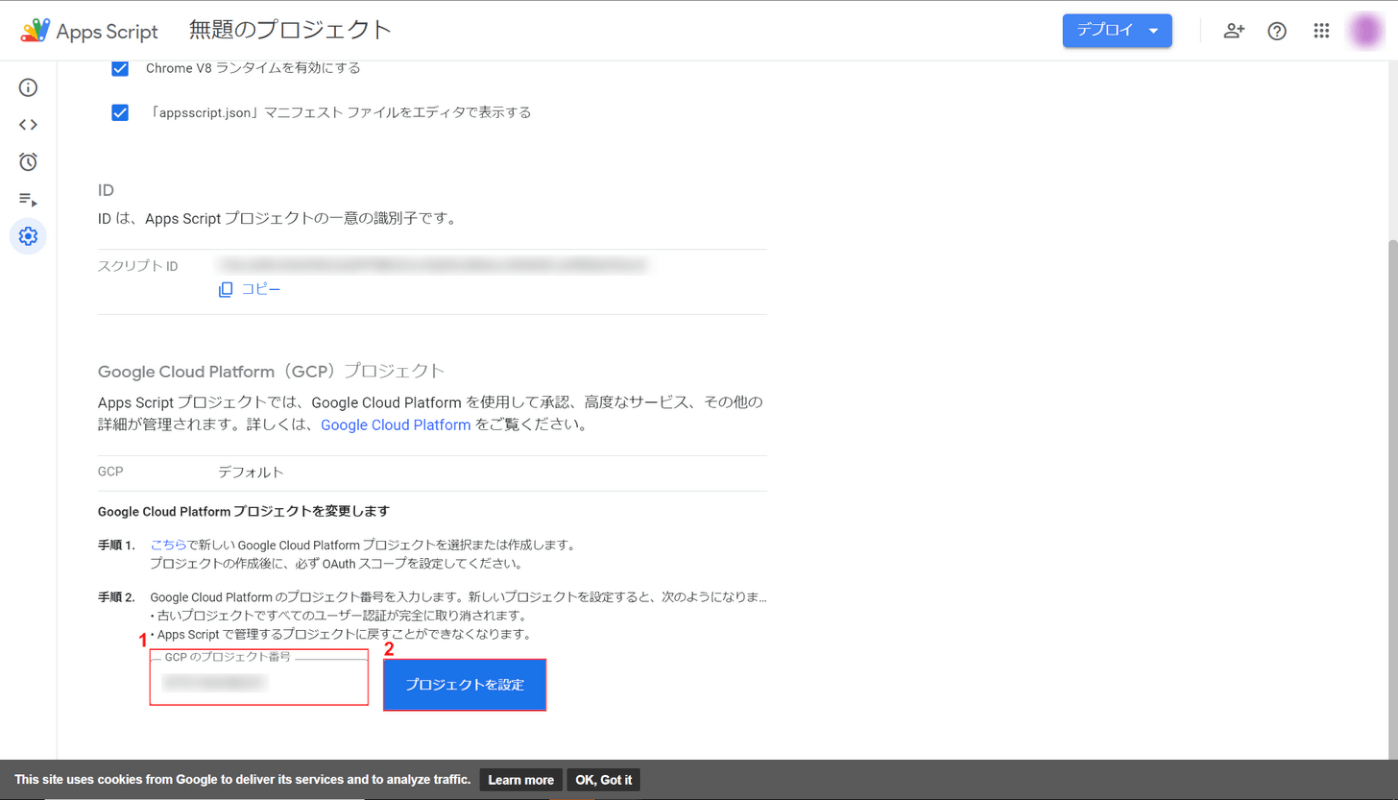
Apps Scriptプロジェクトに戻り、①「GCPのプロジェクト番号」にGCPでコピーしたプロジェクト番号をペーストします。②「プロジェクトを設定」ボタンをクリックします。
プロジェクト番号が設定されました。①「デプロイ」、②「新しいデプロイ」の順に選択します。
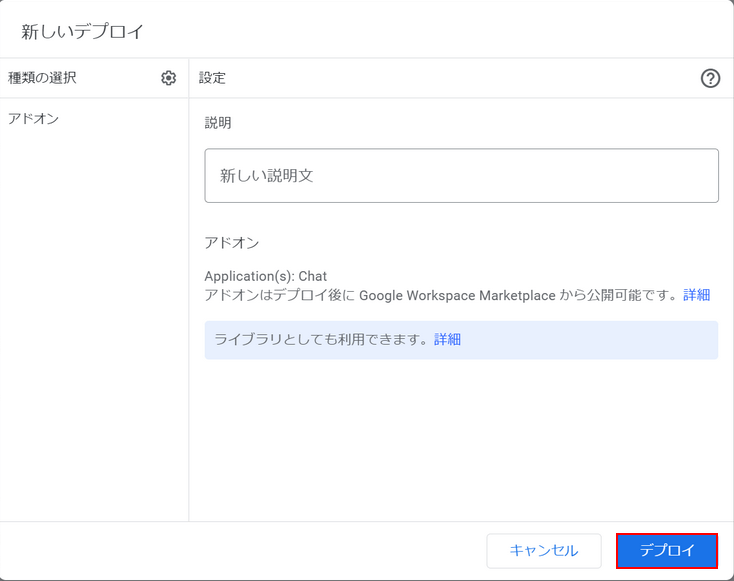
「新しいデプロイ」ダイアログボックスが表示されます。「デプロイ」ボタンをクリックします。
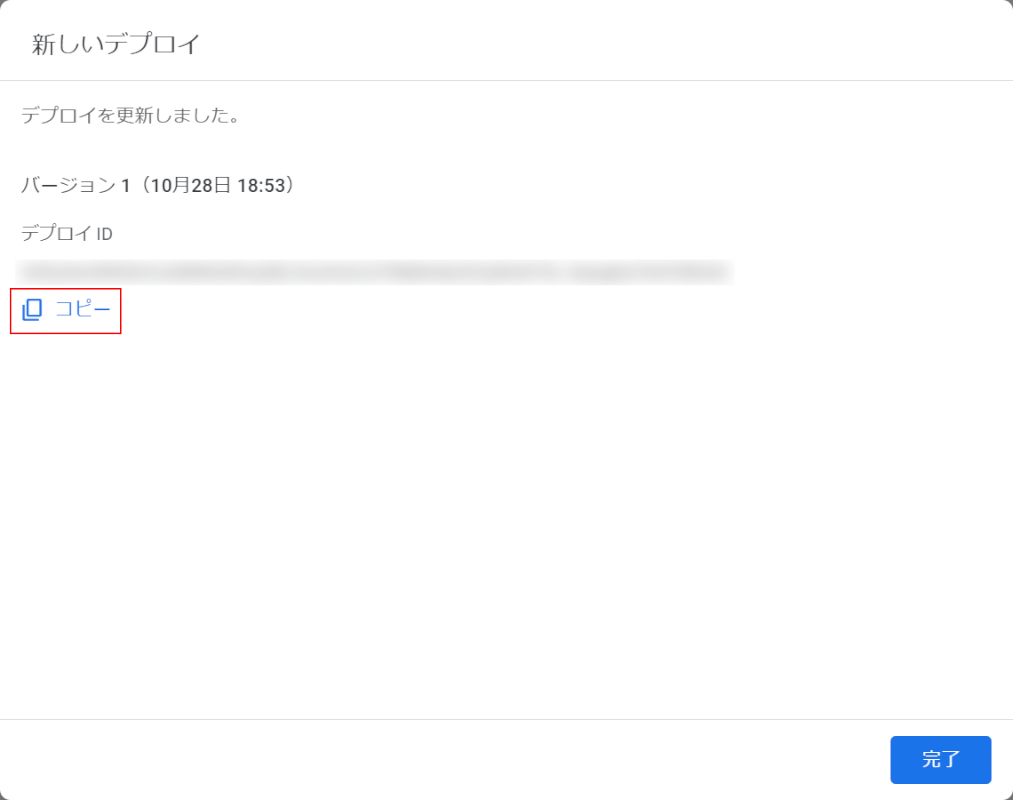
デプロイを更新しました。デプロイIDの「コピー」をクリックします。
Google Cloud PlatformでBotを公開する
デプロイIDを取得できたらGoogle Cloud PlatformでBotを公開しましょう。
Google Cloud PlatformのAPIライブラリにアクセスし、検索ボックスに「Chat」と入力し、「Enter」キーを押します。
検索結果が表示されます。検索結果から「Google Chat API」を選択します。
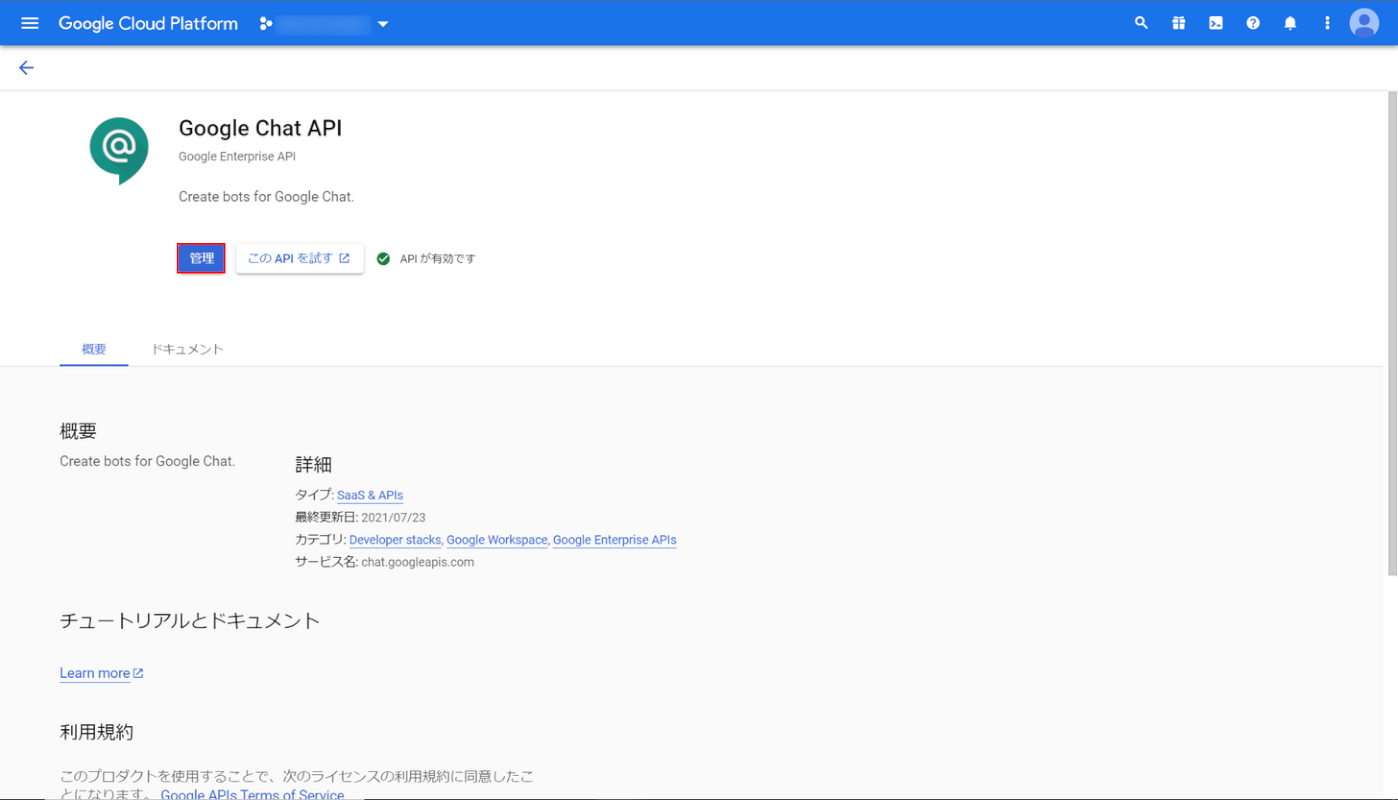
Google Chat APIの詳細が表示されます。「管理」ボタンをクリックします。
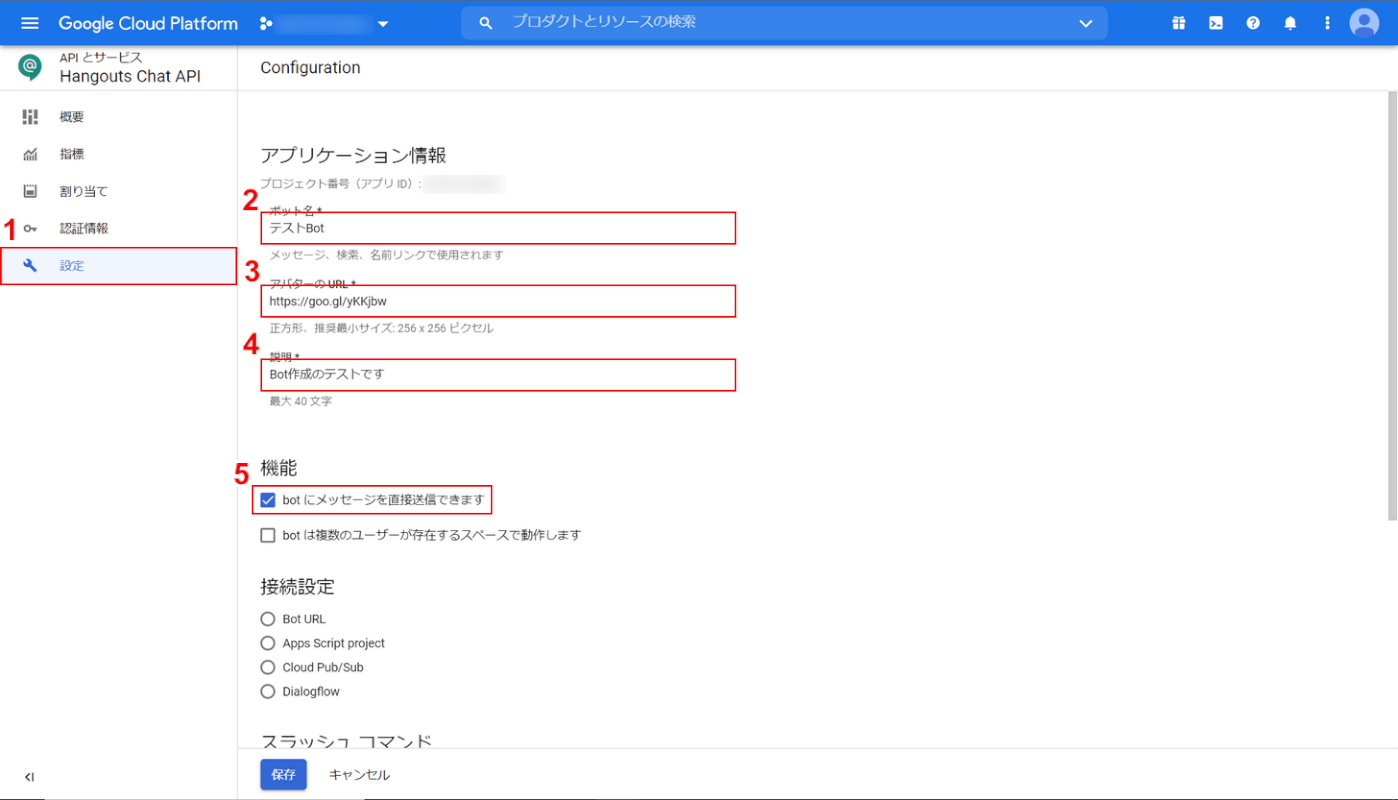
①左ナビゲーションから「設定」を選択します。②「ボット名」、③「アバターのURL」、④「説明」を入力し、⑤「botにメッセージを直接送信できます」をチェックします。
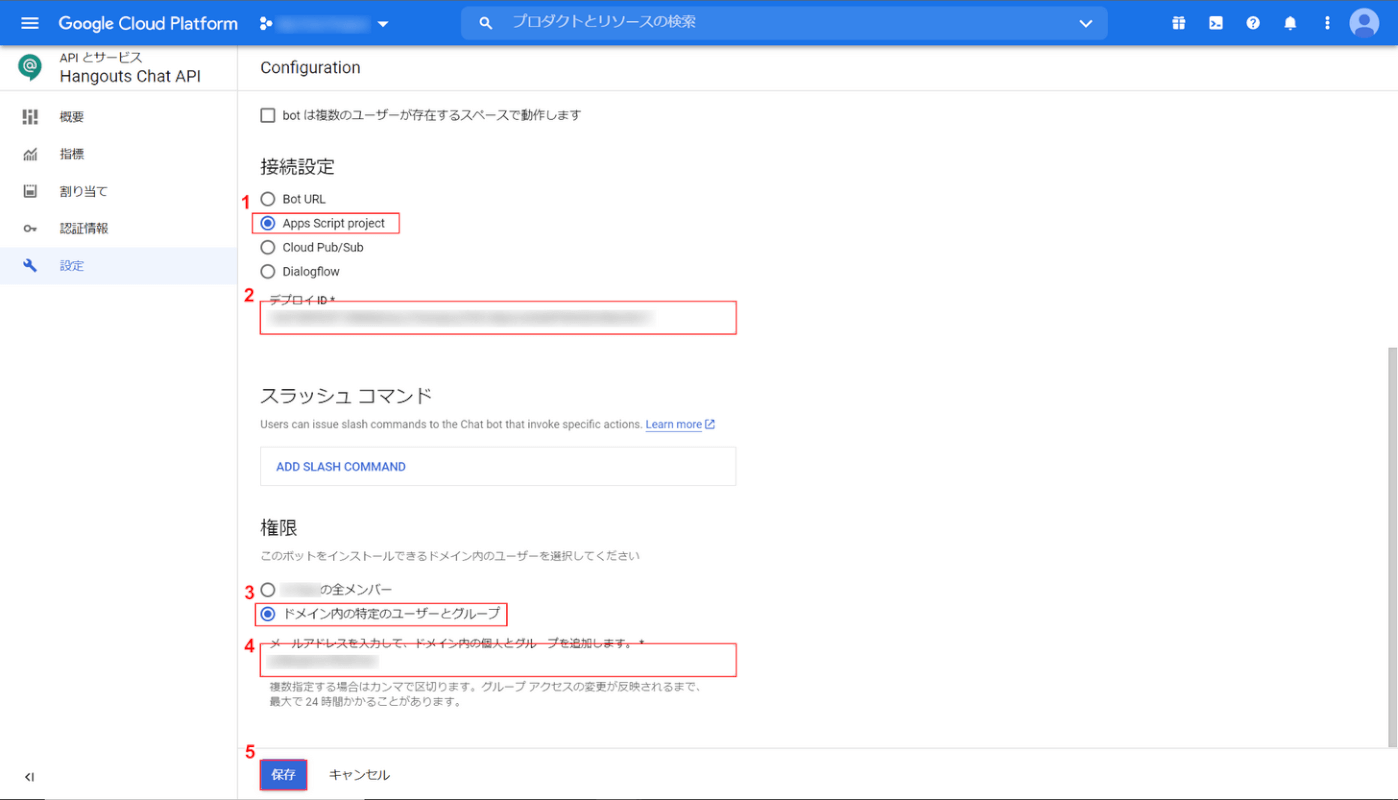
①接続設定で「Apps Script project」を選択し、②「デプロイID」を入力します。③権限で「ドメイン内の特定のユーザーとグループ」を選択し、④「Botを使用したいユーザーのメールアドレス」を入力します。
最後に⑤「保存」ボタンをクリックします。
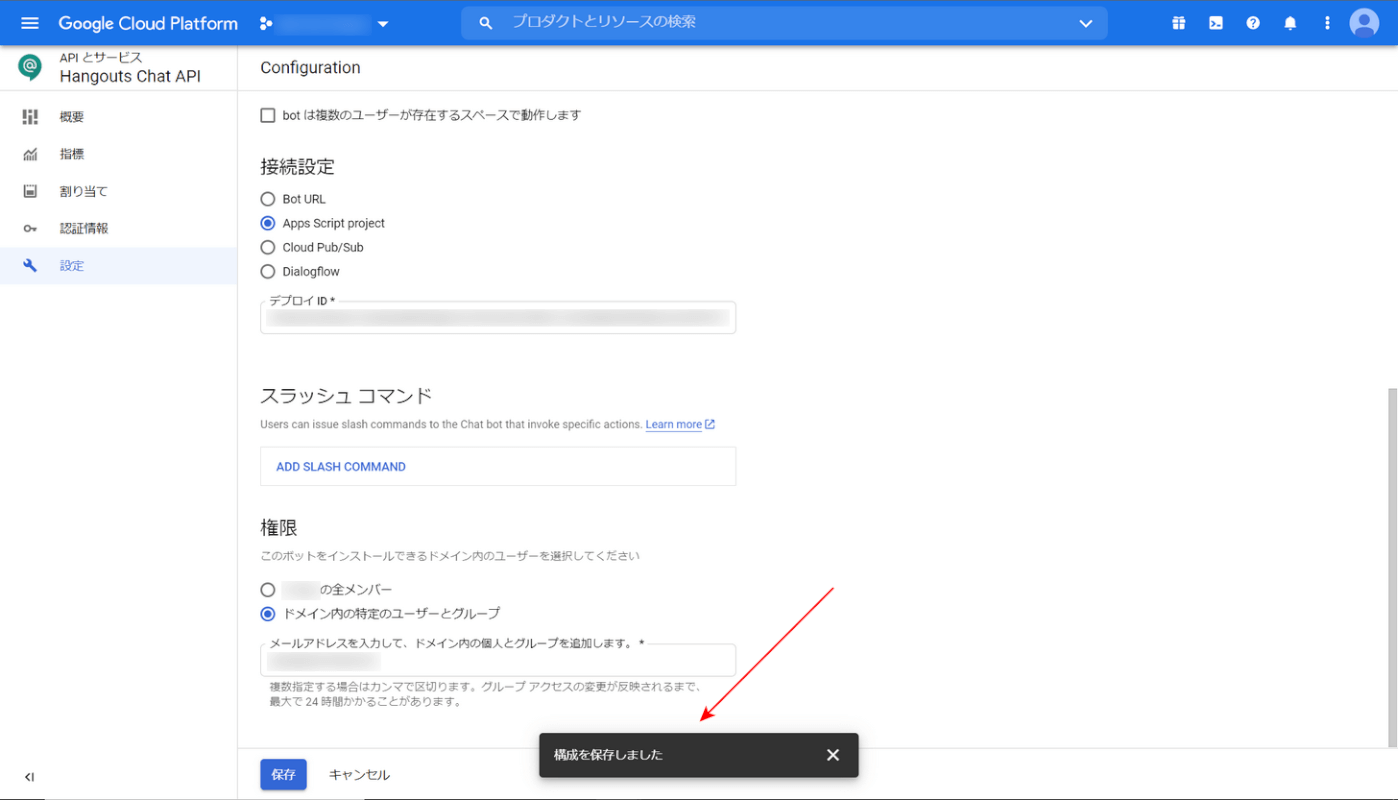
「構成を保存しました」という通知が表示されたらGoogle Chat Botの公開は完了です。
作成したGoogle Chat Botを使用してみましょう。
有料アカウントにログインした状態でGoogle Chatにアクセスし、①「+(チャットを開始)」アイコンをクリックし、②「botを検索」を選択します。
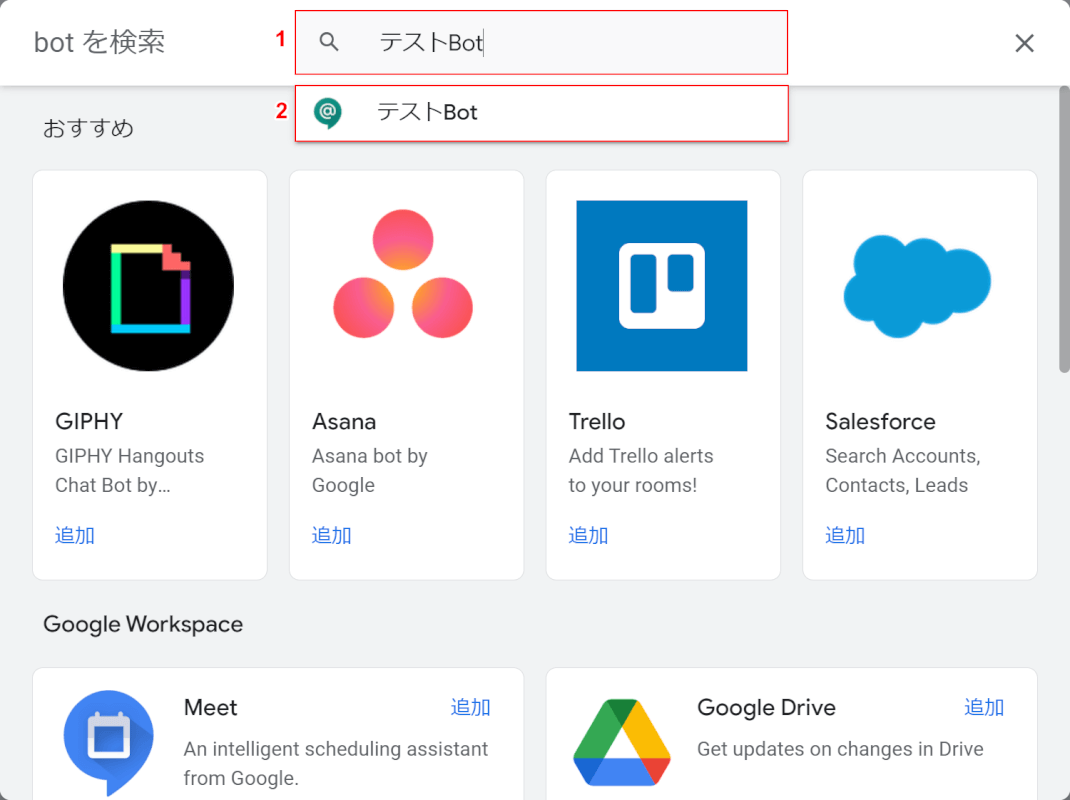
「botを検索」ダイアログボックスが表示されます。検索ボックスに①「作成したBotの名前(例:テストBot)」を入力します。②「サジェストで表示されたBot(例:テストBot)」を選択します。

作成したBotが表示されました。「Chat」ボタンをクリックします。
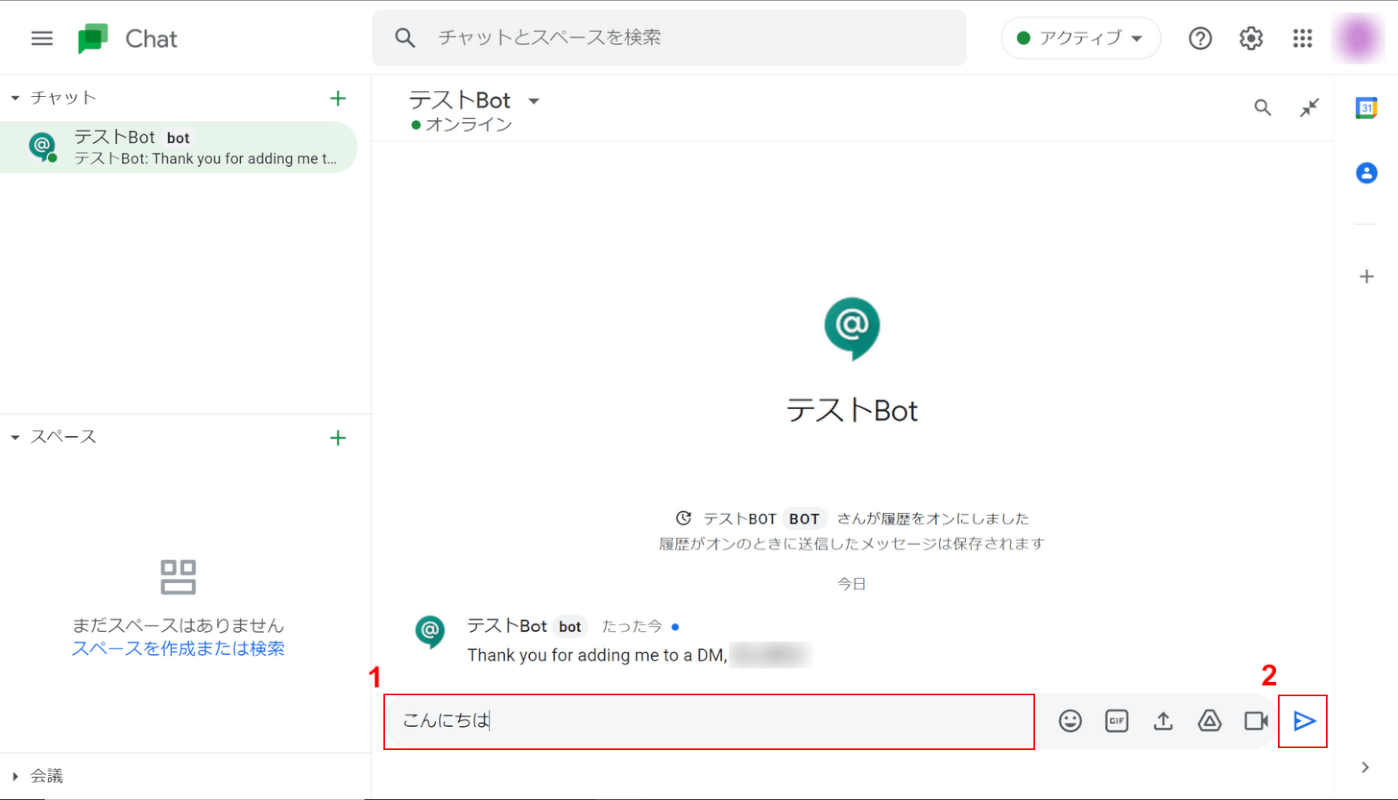
チャットに作成したBotが追加されました。試しにメッセージを送ってみましょう。
①「こんにちは」と入力し、②「送信」アイコンをクリックします。
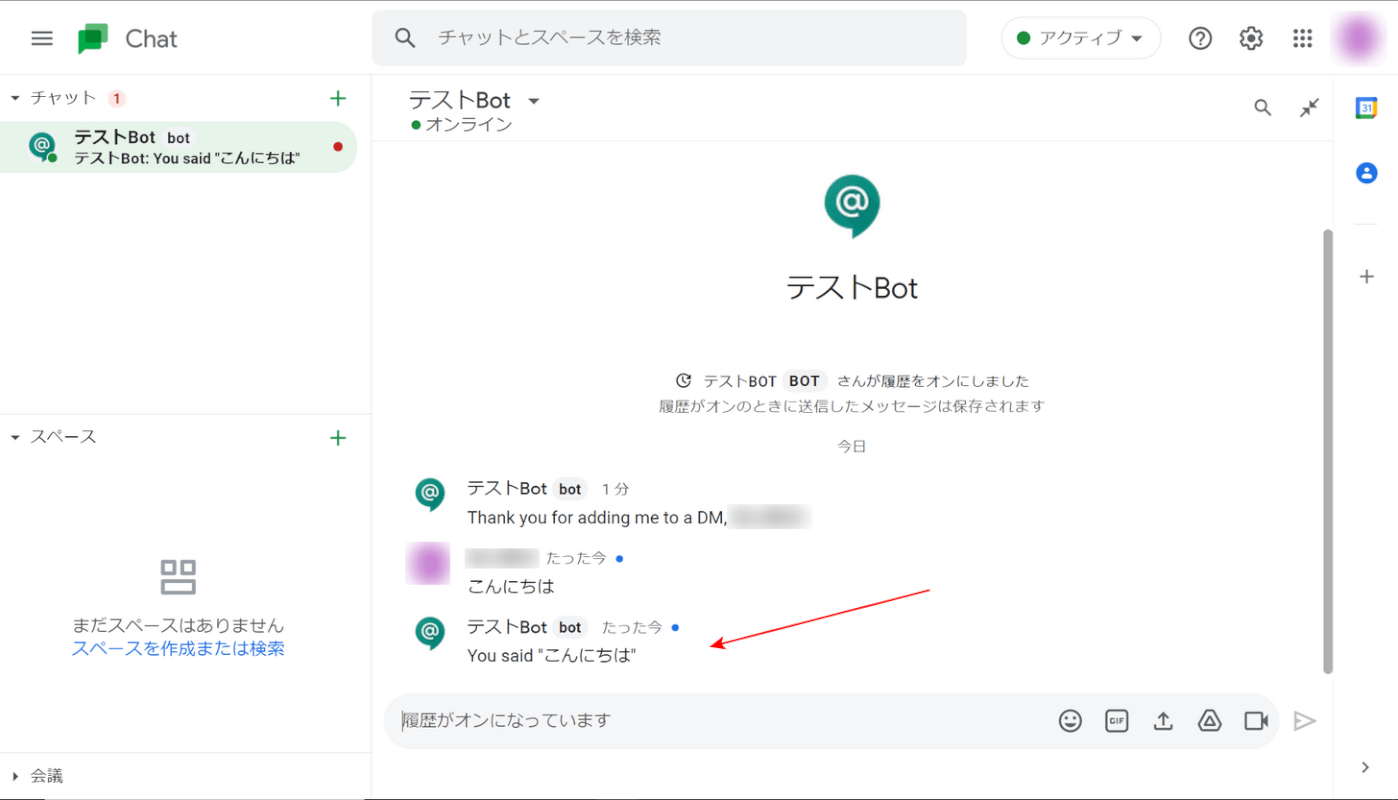
すぐにBotから「You said "こんにちは"」というメッセージが返ってきました。以上でGoogle Chat Botを作成することができました。
Apps ScriptをカスタマイズすることでBotにさまざまな動作をさせることも可能です。アイディア次第で業務を効率化することもできるので挑戦してみましょう。